Author: 99tpb32bkj25

  • Challenge_BI_Alura_2

    Challenge_BI_Alura_2

    Repositório destinado a compartilhar os projetos propostos no Challenge de BI da Alura 2° Edição.

    Documentação em construção…

    Desafios

  • Semana 1: Desafio mercado cinematográfico – Alura Films
  • Semana 2: Desafio mercado de restaurantes – Alura Food
  • Semanas 3 e 4: Desafio métricas de vendas – Alura Skimo
  • A empresa Alura Films necessitava fazer uma pesquisa de mercado, com a finalidade de identificar a seleção ideal de elenco e produção.

    BI Alura Films Completo

    Dados

    Foram disponibilizados dois conjuntos de dados.

    • 1. Base de dados contendo informações sobre 1000 filmes, tais como, nome, ano de lançamento, diretor, atores, gênero, faturamento, número de votos recebidos, pontuação, classificação, tempo de execução e resumo
    • 2. Arquivo com informações sobre código e URL das imagens de cada filme.

    Tratamento dos dados

    Base de dados original:

    • dados da coluna ‘gênero’ divididos por delimitador resultando em 3 novas colunas com informações de gênero
    • linhas vazias filtradas
    • obtenção de nova coluna de data a partir do ano de lançamento

      A base tratada foi utilizada para obter 3 novas tabelas: atores, gênero e cachê médio por gênero

    Tabela gênero e cachê médio por gênero

    • Agrupamento dos dados de gênero e média do valor de cache.

    Tabela Atores

    • colunas “Data”, “Classificação”, “Tempo filme”, “Gênero.1”, “Gênero.2”, “Gênero.3”, “Overview”, “Pontuação do filme”, “Director” removidas;
    • colunas referentes ao atores (“Star1”, “Star2”, “Star3”, “Star4”) transformadas em linha, resultando em duas novas colunas, “Atributo” – indica o “grau” do ator, “Ator” – contendo o nome dos atores.

    Tabela Gênero:

    • colunas “Ano lançamento”, “Classificação”, “Tempo filme”, “Director”, “Star1”, “Star2”, “Star3”, “Star4”, “Número de votos”, “Data”, “Overview” removidas.

    Medidas

    • Tabela calendário
    • Tabela medidas
    • medidas criadas usando função de filtro.

      Elas compõe a maior parte das informações na primeira página.

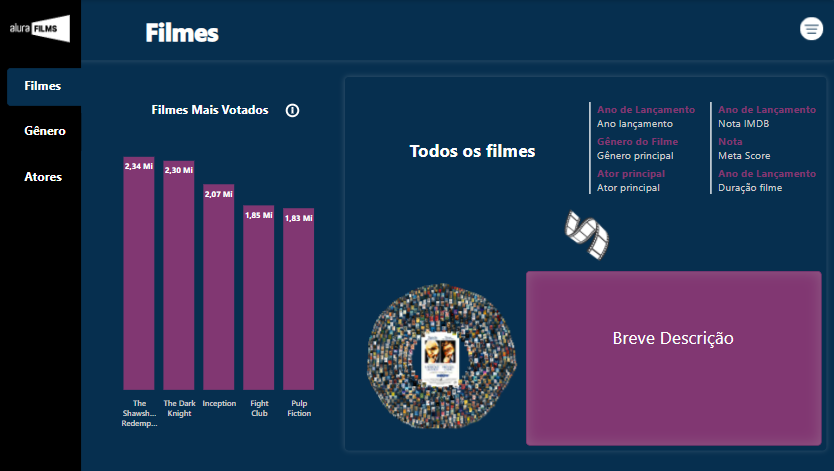
      📊 Ranking dos filmes por número de votos

    Resultados

      Filtro

      Ícone para ativação de filtros por gênero, Diretor e Ano de lançamento.

    • Filmes mais votados e informações sobre ano, gênero, ator principal, nota
    • Descrição do filme e capa
    • Quantidade de filmes por gênero
    • 10 gênero com maior cache
    • Notas por gênero
    • 5 atores que mais fizeram filmes
    • Cache médio dos filmes por ator
    • Atores que fizeram filmes com maior cachê
    • Ranking dos filmes mais votados
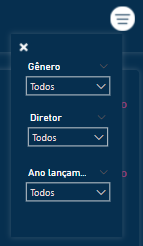
    Dashboard

    Dashboard Alura Films

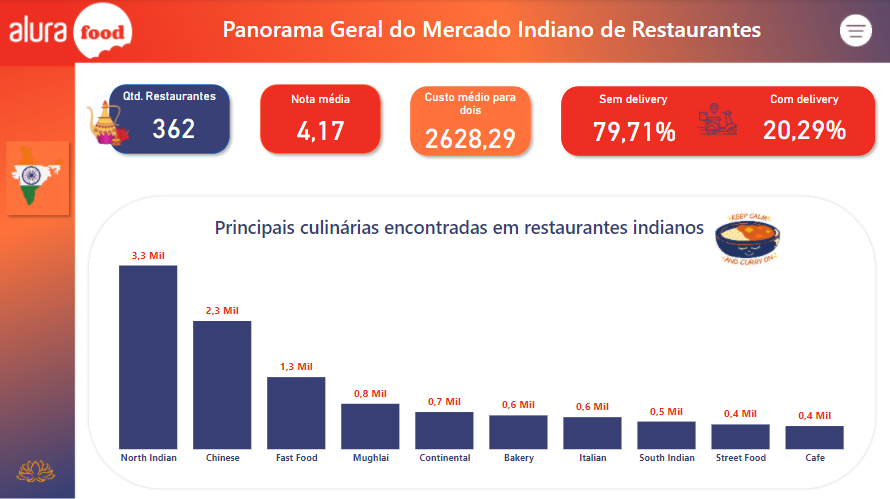
    A Alura Food tem interesse em expandir seu negócio entrando no mercado indiano. Para isso, ela precisa da criação de métricas e análise dos dados disponibilizados para tomar a melhor decisão.

    BI Alura Food Completo

    Dados

    Tratamento dos dados

    Dashboard

    Dashboard Alura Food

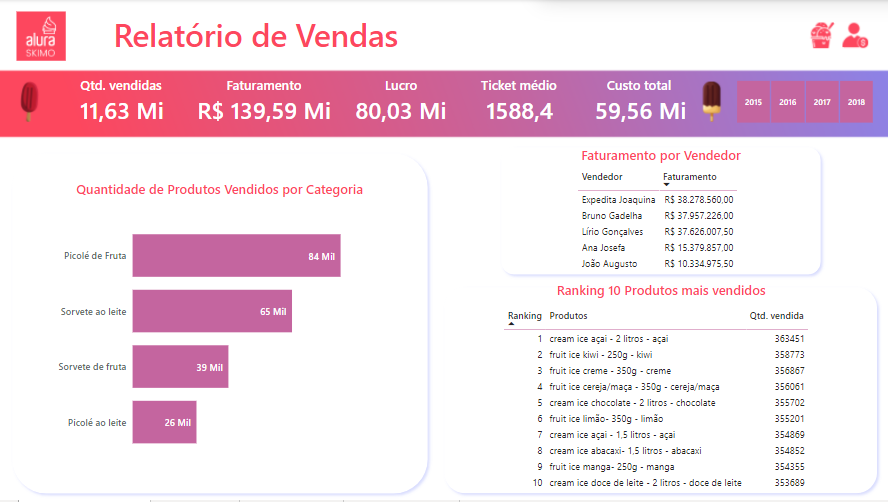
    A empresa Alura Skimo necessita acompanhar suas vendas através de um painel que comporte todas métricas necessárias.

    BI Alura Skimo Completo

    Dados

    Tratamento dos dados

    Dashboard

    Dashboard Alura Skimo

    Visit original content creator repository https://github.com/CarolineOlive/Challenge_BI_Alura_2
  • Earth-Entry-Sim

    Earth Entry Simulator

    This is a relatively simple low-fidelity sim for blunt capsules (re)entering Earth’s atmosphere.

    Some features:

    • Simple atmospheric model from Braeunig’s Rocket & Space Technology (US Standard Atmos)
    • 2D & 3D versions
      • WGS-84 ellipsoid for 3D
    • fixed aerodynamic coefficients
    • 1st order entry heating and heatshield design (PICA)

    Vehicle Design:

    Configure the mass, geometry, and aerodynamics of the vehicle (point mass). SpaceX Crew Dragon example from my work here:

    % input values: DESIGN
    m = 21200/2.205; % mass of entry vehicle (kg)
    Cd = 1.23; % drag coefficient
    Cl = 0.27*Cd; % lift coefficient          -> modulated in flight (roll angle), used as constant "fudge factor" in this sim
    d = 4; % entry vehicle diameter (m)
    S = (d/2)^2*pi(); % ref. area (m^2)
    BC = m/(S*Cd); % ballistic coefficient (kg/m^2)
    Rn = 2; % nose radius (m)                 -> used as a "fudge factor" in this sim for heating calcs
    emis = 0.9; % thermal IR emmisivity (0.9 for PICA)
    

    Entry Conditions Setup:

    2D:

    Specify either: apoapsis height & peripsis height OR inertial entry velocity and entry flight path angle.

    Example:

    type = 'Orbital'; % specify type of entry: 'Orbital' or 'IC' (initial conditions)
    if strcmp(type,'Orbital')
        Conditions = [22,419]; % periapsis and apoapsis altitudes (km) -> LEO return
    else % initial conditions case
        Conditions = [-6.45,11.4]; % EFPA (°) and Entry Velocity (km/s) -> Martian direct entry return
    end
    

    3D:

    Pseudo orbital elements: apoapsis height, peripsis height, inclination, (Earth) longitude of ascending node, argument of peripsis. Again SpaceX Crew Dragon example here & here:

    Conditions = [22,418]; % periapsis and apoapsis altitudes (km)
    
    % Initial Orbit Angles
    inc = 51.6; % inclination (°)           -> ISS inclination
    RAAN = 127; % (Earth) longitude of ascending node (°)
    w = 165; % argument of periapsis (°)    -> RAAN & w tuned to facilitate landing near Florida from the northwest
    

    Entry Heating & PICA Heat Shield Design:

    Extensive leverage of methods from my work here. Returns a first order estimate of required stagnation point 1D heatshield thickness. Specific to the PICA material:

    • Calculate Sutton & Graves convective & Martin radiative heating rates
    • assume radiative equilibrium to find thermal environment around vehicle stagnation point
    • use PICA ablation data and thermal properties to:
      • estimate & integrate ablation rate to find total thickness “lost”
      • 1D unsteady heat flow to determine minimum “insulation thickness” to keep bondline from failing

    Which script to use?

    EarthEntry2D.m: For generating quick loading & heating data/plots, vehicle design workshopping, & use with high energy entries (lunar, interplanetary). Example outputs (non-exhaustive):

    image

    EarthEntry3D.m: For generating quick loading & heating data/plots, vehicle design workshopping, but in 3D. Example outputs (non-exhaustive):

    image

    EarthEntry3D_Observation.m: For planning/predicting observations of reentering vehicles (like here). Adds heating rate representation to 3D trajectory plots. It skips outputs/plots of ancilliary trajectory data. Example outputs (non-exhaustive):

    image

    Visit original content creator repository https://github.com/BrendanLuke15/Earth-Entry-Sim
  • ENOT-transformers

    Transformer inference on TensorRT with INT-8 precision

    Repository contains inference example and accuracy validation of quantized transformer TensorRT models.
    All onnx models are published on Hugging Face 🤗:

    Our example notebooks automatically download the appropriate onnx and build engine.

    Metrics:

    GPT2-XL

    TensorRT INT8+FP32 torch FP16
    Lambada Acc 72.11% 71.43%
    Model size (GB) 2.0 3.2

    GPT-J 6B

    TensorRT INT8+FP32 torch FP16 torch FP32
    Lambada Acc 78.46% 79.53%
    Model size (GB) 8.5 12.1 24.2

    Test environment

    • GPU RTX 4090
    • CPU 11th Gen Intel(R) Core(TM) i7-11700K
    • TensorRT 8.5.3.1
    • pytorch 1.13.1+cu116

    Latency:

    GPT2-XL

    Input sequance length Number of generated tokens TensorRT INT8+FP32 ms torch FP16 ms Acceleration
    64 64 462 1190 2.58
    64 128 920 2360 2.54
    64 256 1890 4710 2.54

    GPT-J 6B

    Input sequance length Number of generated tokens TensorRT INT8+FP32 ms torch FP16 ms Acceleration
    64 64 1040 1610 1.55
    64 128 2089 3224 1.54
    64 256 4236 6479 1.53

    Test environment

    • GPU RTX 4090
    • CPU 11th Gen Intel(R) Core(TM) i7-11700K
    • TensorRT 8.5.3.1
    • pytorch 1.13.1+cu116

    Visit original content creator repository
    https://github.com/ENOT-AutoDL/ENOT-transformers

  • klimat

    🌡️ Klimat ❄️

    Klimat, or climate in Swedish, can be used to turn devices that help you
    manage and monitor the indoor climate into Hemtjänst sensors and make them
    controllable.

    Right now the only supported thing is reading the values from the Philips
    AC 3829/10. It is expected to work with any Philips device in this
    category, that uses the CoAP with encrypted payloads protocol/firmware.

    It is worth noting that these devices automatically send all their sensor
    data to Philips using AWS IoT, regardless of whether you are logged in to
    a Philips account. This is how the AirMatters app displays historical values.
    If you find this creepy, you can isolate the device in its own VLAN and deny
    it access to the outside world. Everything will keep working, including the
    AirMatters app, except for it no longer being able to show you historical
    values. Doing so also breaks the notifications feature.

    CLI

    A command line client is provided, implementing two subcommands:

    • control: lets you configure certain aspects of the device
    • discover: uses multicast CoAP to find compatible devices on your network
    • publish: publishes the data to MQTT
    • status: like publish, but outputs on the CLI instead

    philips

    The philips package contains all the logic to handle communication with
    a device. It includes a lot of things to handle a ton of weird idiosyncracies
    in both the protocol and its custom payload encryption scheme.

    This package is usable without needing to be invested in the rest of the
    Hemtjänst ecosystem.

    Visit original content creator repository
    https://github.com/hemtjanst/klimat

  • AudioVisual

    AudioVisual

    This a plugin of audio data visualization

    av.gif

    Have

    • 可视化音频数据
    • 自定义渐变色
    • 支持两种数据接入方式

    API

    check this file: src/index.ts

    Example

    check this file: test/index.html

    Install

    1. 标签引入
    <script src="./dist/AudioVisual.min.js"></script>
    1. 实例化(file可选)
    var av = new AudioVisual(audio, canvas[, config]);

    Params

                                                   
    参数 说明 类型 默认值
    audio音频节点 HTMLAudioElement
    canvas画布 HTMLCanvasElement
    config配置 object 参见下面的配置说明 options

    options

                                                               
    参数 说明 类型 默认值
    isAutoRun在音频文件读取完成后立即运行 boolean true
    thickness粒度 number 默认 2048 范围 32~32768,必须是2的n次方
    colorStops渐变色序列 string[] 内置默认6种渐变色
    fileElement文件控件,获取音频文件的入口 HTMLInputElement 可选

    Contributing

    • Fork this Repo first
    • Clone your Repo
    • Install dependencies by $ npm install
    • Checkout a feature branch
    • Feel free to add your features
    • Make sure your features are fully tested
    • Publish your local branch, Open a pull request
    • Enjoy hacking <3

    MIT license

    Copyright (c) 2018 yangfan2016 <15234408101@163.com>

    Permission is hereby granted, free of charge, to any person obtaining a copy of this software and associated documentation files (the “Software”), to deal in the Software without restriction, including without limitation the rights to use, copy, modify, merge, publish, distribute, sublicense, and/or sell copies of the Software, and to permit persons to whom the Software is furnished to do so, subject to the following conditions:

    The above copyright notice and this permission notice shall be included in all copies or substantial portions of the Software.

    THE SOFTWARE IS PROVIDED “AS IS”, WITHOUT WARRANTY OF ANY KIND, EXPRESS OR IMPLIED, INCLUDING BUT NOT LIMITED TO THE WARRANTIES OF MERCHANTABILITY, FITNESS FOR A PARTICULAR PURPOSE AND NONINFRINGEMENT. IN NO EVENT SHALL THE AUTHORS OR COPYRIGHT HOLDERS BE LIABLE FOR ANY CLAIM, DAMAGES OR OTHER LIABILITY, WHETHER IN AN ACTION OF CONTRACT, TORT OR OTHERWISE, ARISING FROM, OUT OF OR IN CONNECTION WITH THE SOFTWARE OR THE USE OR OTHER DEALINGS IN THE SOFTWARE.


    built upon love by docor v0.3.0

    Visit original content creator repository https://github.com/Yangfan2016/AudioVisual
  • AudioVisual

    AudioVisual

    This a plugin of audio data visualization

    av.gif

    Have

    • 可视化音频数据
    • 自定义渐变色
    • 支持两种数据接入方式

    API

    check this file: src/index.ts

    Example

    check this file: test/index.html

    Install

    1. 标签引入
    <script src="./dist/AudioVisual.min.js"></script>
    1. 实例化(file可选)
    var av = new AudioVisual(audio, canvas[, config]);

    Params


    参数 说明 类型 默认值
    audio 音频节点 HTMLAudioElement
    canvas 画布 HTMLCanvasElement
    config 配置 object 参见下面的配置说明 options

    options


    参数 说明 类型 默认值
    isAutoRun 在音频文件读取完成后立即运行 boolean true
    thickness 粒度 number 默认 2048 范围 32~32768,必须是2的n次方
    colorStops 渐变色序列 string[] 内置默认6种渐变色
    fileElement 文件控件,获取音频文件的入口 HTMLInputElement 可选

    Contributing

    • Fork this Repo first
    • Clone your Repo
    • Install dependencies by $ npm install
    • Checkout a feature branch
    • Feel free to add your features
    • Make sure your features are fully tested
    • Publish your local branch, Open a pull request
    • Enjoy hacking <3

    MIT license

    Copyright (c) 2018 yangfan2016 <15234408101@163.com>

    Permission is hereby granted, free of charge, to any person obtaining a copy
    of this software and associated documentation files (the “Software”), to deal
    in the Software without restriction, including without limitation the rights
    to use, copy, modify, merge, publish, distribute, sublicense, and/or sell
    copies of the Software, and to permit persons to whom the Software is
    furnished to do so, subject to the following conditions:

    The above copyright notice and this permission notice shall be included in
    all copies or substantial portions of the Software.

    THE SOFTWARE IS PROVIDED “AS IS”, WITHOUT WARRANTY OF ANY KIND, EXPRESS OR
    IMPLIED, INCLUDING BUT NOT LIMITED TO THE WARRANTIES OF MERCHANTABILITY,
    FITNESS FOR A PARTICULAR PURPOSE AND NONINFRINGEMENT. IN NO EVENT SHALL THE
    AUTHORS OR COPYRIGHT HOLDERS BE LIABLE FOR ANY CLAIM, DAMAGES OR OTHER
    LIABILITY, WHETHER IN AN ACTION OF CONTRACT, TORT OR OTHERWISE, ARISING FROM,
    OUT OF OR IN CONNECTION WITH THE SOFTWARE OR THE USE OR OTHER DEALINGS IN
    THE SOFTWARE.


    built upon love by docor v0.3.0

    Visit original content creator repository
    https://github.com/Yangfan2016/AudioVisual

  • Argon-Flutter-Buttons

    Argon Buttons (Timer and Loading)

    Create beautiful Loading and Timer buttons using Argon Buttons. No need to worry about handling animations or timers as this pakage does all the messy stuff for you.

    Getting Started

    You basically have two widgets that you can use, ArgonButton and ArgonTimerButton. ArgonButton helps you create beautiful loading animation in your buttons. ArgonTimerButton helps you create timer buttons that you can use to handle stuff like “Resend OTP” => “Wait for 10 sec”.

    Demo

    Argon Timer Button Demo Argon Loader Button Demo

    ArgonButton

    ArgonButton is basically RaisedButton on steroids. That means that you can use the usual parameters that you use with RaisedButtons with a few extra functionalities.

    Example:

    ArgonButton(
      height: 50,
      width: 350,
      borderRadius: 5.0,
      color: Color(0xFF7866FE),
      child: Text(
        "Continue",
        style: TextStyle(
            color: Colors.white,
            fontSize: 18,
            fontWeight: FontWeight.w700
    	),
      ),
      loader: Container(
        padding: EdgeInsets.all(10),
        child: SpinKitRotatingCircle(
          color: Colors.white,
          // size: loaderWidth ,
        ),
      ),
      onTap: (startLoading, stopLoading, btnState) {
      },
    )

    This creates a button that animates to a circular loader whenever we want to do a network request or any other task that takes some time to output the response. Here I am using SpinKit for showing the rotating loader inside my button. You can use what ever you like.

    We animate the button by using the parameters passed in onTap function. On Tap recieves 3 parameter: startLoading(), stopLoading() and btnState

    You can call the startLoading function to change the state of the button to Busy which will animate the button and show the loader. When you call the stopLoading function, the button goes to the norma(Idle) state. In the third parameter btnState you can actually check the current state of the button.

    Using onTap:

    ArgonButton(
    [...]
    onTap:(startLoading, stopLoading, btnState){
      if(btnState == ButtonState.Idle){
        startLoading();
        await doNetworkRequest();
        stopLoading();
      }
    }
    )

    Properties

    • roundLoadingShape(Default true) : When set to true, it uses borderRadius to creates a round button while in Busy/Loading state
    • width: Width of the button when in Idle state
    • minWidth: Width of the button when in Busy/Loading state. Default value is equal to height in order to create a completely round loading button
    • borderRadius: Border Radius of the button
    • borderSide : BorderSide in order to give border color and width to the button
    • child: Contents of button when in Idle state
    • loader: Contents of button when in Busy/Loading state
    • onTap: (startLoading, stopLoading, btnState) : Function that is called when you click on the button

    ArgonTimerButton

    ArgonTimerButton is similar to ArgonButton but it also has the functionality of working as a Timer button. You can not only give it a initialTimer value but also restart the timer with different countdown from the onTap function.

    Example:

    ArgonTimerButton(
      initialTimer: 10, // Optional
      height: 50,
      width: MediaQuery.of(context).size.width * 0.45,
      minWidth: MediaQuery.of(context).size.width * 0.30,
      color: Color(0xFF7866FE),
      borderRadius: 5.0,
      child: Text(
        "Resend OTP",
        style: TextStyle(
            color: Colors.black,
            fontSize: 18,
            fontWeight: FontWeight.w700
        ),
      ),
      loader: (timeLeft) {
        return Text(
          "Wait | $timeLeft",
          style: TextStyle(
              color: Colors.black,
              fontSize: 18,
              fontWeight: FontWeight.w700
            ),
        );
      },
      onTap: (startTimer, btnState) {
        if (btnState == ButtonState.Idle) {
          startTimer(20);
        }
      },
    ),

    The onTap function recieves a startTimer(int count) function and a btnState variable. You can use the startTimer function and pass in the new countdown value to restart the counter. This could be very useful for Resend OTP button where after every click you want to reset the counter to a new value from the server. The loader in this case is a button that recieves time left from the timer and has to return a widget which will be the child in the button.

    Properties

    • initialTimer (Optional): it is a optional value given to start the timer when the widget is build
    • roundLoadingShape(Default true) : When set to true, it uses borderRadius to creates a round button while in Busy/Loading state
    • width: Width of the button when in Idle state
    • minWidth: Width of the button when in Busy/Loading state. Default value is equal to height in order to create a completely round loading button
    • borderRadius: Border Radius of the button
    • borderSide : BorderSide in order to give border color and width to the button
    • child: Contents of button when in Idle state
    • loader: It is a function that recieves the left time as parameter and returns the contents of button when in Busy/Loading state
    • onTap: (startTimer, btnState) : Function that is called when you click on the button

    More

    • duration: Duration of the animation
    • curve: Curve of animation
    • reverseCurve: Curve of reverse animation
    Visit original content creator repository https://github.com/iamyogik/Argon-Flutter-Buttons
  • hephaestus

    hephaestus

    works badge

    In Greek mythology, the god of fire, and of the arts which need fire in the execution. He was said to be the son of Zeus and Hera, or (according to Hesiod) of the latter only.

    Description

    Hephaestus is a CLI-based firewall ruleset generator built for UNIX/Linux systems running iptables written in Go 1.7.4. Currently, the following protocols are supported: SSH, ICMP, HTTP, and HTTPS.

    Usage

    > $ ./core -i "(permit|deny) (inbound|outbound) (ssh|icmp|http|https)) 
    

    Demonstration

    [1450:9545 - 0:1693] 2017-01-16T19:28:40CST [REDACTED_USER@REDACTED_HOST:o +2] ~/git/hephaestus/src 
    $ ./core -i "deny inbound ssh"
    [DEBUG] verb validity check: PASSED
    [DEBUG] flow validity check: PASSED
    [DEBUG] protocol validity check: PASSED
    [DEBUG] isvalidstatement: PASSED
    -------------------------------------
    -A INPUT -p tcp -m --dport 22 -j DENY
    
    [1450:9545 - 0:1694] 2017-01-16T19:28:51CST [REDACTED_USER@REDACTED_HOST:o +2] ~/git/hephaestus/src 
    $ ./core -i "deny inbound icmp"
    [DEBUG] verb validity check: PASSED
    [DEBUG] flow validity check: PASSED
    [DEBUG] protocol validity check: PASSED
    [DEBUG] isvalidstatement: PASSED
    -------------------------------------
    -A INPUT -p icmp -m icmp --icmp-type 0 -j DENY
    -A INPUT -p icmp -m icmp --icmp-type 3 -j DENY
    -A INPUT -p icmp -m icmp --icmp-type 11 -j DENY
    
    [1450:9545 - 0:1696] 2017-01-16T19:34:01CST [REDACTED_USER@REDACTED_HOST:o +2] ~/git/hephaestus/src 
    $ ./core -i "permit outbound icmp"
    [DEBUG] verb validity check: PASSED
    [DEBUG] flow validity check: PASSED
    [DEBUG] protocol validity check: PASSED
    [DEBUG] isvalidstatement: PASSED
    -------------------------------------
    -A OUTPUT -p icmp -m icmp --icmp-type 0 -j PERMIT
    -A OUTPUT -p icmp -m icmp --icmp-type 3 -j PERMIT
    -A OUTPUT -p icmp -m icmp --icmp-type 11 -j PERMIT
    
    [1450:9545 - 0:1697] 2017-01-16T19:34:14CST [REDACTED_USER@REDACTED_HOST:o +2] ~/git/hephaestus/src 
    $ 
    
    Visit original content creator repository https://github.com/jdnlab/hephaestus
  • Graphics-and-multimedia-laboratory

    Graphics and multimedia laboratory

    1 – Lines

    Using the equation of a straight line y = ax + b, write a program for drawing lines. The end of the line should be chosen by the mouse.

    2 – Drawing circles and ellipses

    1. Using the equation x^2 + y^2 = r^2, write a program for drawing circles. Center point and radius of circle should be chosen by the mouse.
    2. By using parametric equation:
      { x = a * cos(t)
      { y = b * sin(t)
      write a program for drawing polygons, where vertices of polygon are lying on the ellipse set by the above equation. Center point and axes of the ellipse should be chosen by the mouse.

    3 – Bezier Curves

    Write a program for drawing bezier curves of order 3 constructed from few connected segments. Program should allow adding and moving control points.

    4 – B-Spline

    Write a program for drawing B-Spline curves of order 3 (homogeneous). Program should allow adding and moving control points.

    5 – Flood Fill

    Write a program for filling polygons (and others figures) with specified color by using Flood Fill technique.

    6 – Color Models

    Write a program that represents two color models – RGB and HSV.

    7 – Blend Modes

    Write a program presenting at least 5 selected blending modes.

    8 – Morphological Operations

    Write a program presenting the action of the 4 basic morphological operations (erosion, dilation, opening, closing) on binary image.

    9 – 2D Transformations

    Write a program that illustrates the basic geometric transformations (translation, rotation, scale, skew).

    10 – Triangle Texturing

    Write a program that applies a texture to a triangle. Vertices of triangles need to be specified by mouse.

    11 – Morphing

    Write a program that shows the effect of morphing.

    12 – 3D Solid

    1. Write a program for drawing cube or other solid in perspective projection. Implement the transformation of the solid (translation, rotation, scale and shearing).
    2. Add option to hide invisible faces.
    3. Add option to shading faces of solid (at least one source of light).

    13 – Project

    Visit original content creator repository
    https://github.com/RMariowski/Graphics-and-multimedia-laboratory

  • cli

    Low-code automation for inbound emails.

    Get a programmable email address. Automate what happens when you receive emails. It’s like Zapier for devs who hate emails.

    Table of Contents 📚

    Features

    • Low code automations for your emails
    • Create automations to filter and route emails as they hit your inbox.
    • Create an infinte number of email addresses, and automate them individually.
    • Parses every element of the email for you and provides a clean JSON object with all the metadata you will need.
    • No need to transfer over to another email provider: Use your current email provider with Mailscript.
    • Integrate your own custom coded email filters. Filter based on key words, or email header contents.
    • Redirect high priority emails to your primary inbox, keeping it clean of clutter.

    Use Cases

    • Send a text message to your phone upon receiving an important email
    • Auto reply to first time senders.
    • Save important attachments to a file server, or location of choice.

    Getting Started 🚀

    Usage 👩‍💻

    Install through npm

    In order to use the Mailscript CLI, you must first install it with the global flag. Run the following:

    $ npm install -g mailscript

    Alternatively, you could install the dev version (not recommended!)

    $ npm install -g https://github.com/mailscript/cli.git

    Basic usage

    $ mailscript COMMAND
    running command...
    $ mailscript (-v|--version|version)
    mailscript/0.4.8 darwin-x64 node-v14.15.0
    $ mailscript --help [COMMAND]
    USAGE
      $ mailscript COMMAND
    ...
    

    Login via local daemon

    $ mailscript login
    ... 
    You should see a browser window open prompting you to login to your Mailscript account. 
    The daemon will handle the rest upon completion

    Commands ⌨

    Ready to dive into Mailscript? Read the command line documentation

    Development 💬

    Development information available here

    License ⚖

    CLI license: MIT

    Visit original content creator repository https://github.com/featuredotapp/cli