In this program, the first n fibonacci sequence numbers can be found. This was implemented using both recursion (fibs_rec.rb) and iteration (fibs.rb). All the files you will need to run this are in this repository with the instructions in the instructions section. This program is built using Ruby v2.6.3p62.
Status
At this time, the project is finished.
Merge Sort
Information
In this program, a single array is passed and a sorted array is returned. The sort used is a merge sort, with one function to sort the array (using a left and right version of the one passed) and another function to merge the left and right arrays. This is implemented using recursion. All the files you will need to run this are in this repository with the instructions in the instructions section. This program is built using Ruby v2.6.3p62.
Status
At this time, the project is finished.
Instructions
To run these programs, Ruby v2.6.3p62 (or a compatible version) will need to be installed. To check the version of ruby you are using, run this command in terminal:
ruby -v
If ruby is not installed, follow these instructions to install it.
After ruby is installed, you should clone this repository to a place easily accessible to you using this command in terminal:
Your github username and password should be requested. If not, don’t worry about it.
After the repository is cloned, you will need to change the directory to where the game example is saved. To to use the fibonacci programs, run this command next:
cd [LOCATION_OF_CLONED_REPOSITORY]/fibonacci
To use the merge sort programs, run this command instead:
cd [LOCATION_OF_CLONED_REPOSITORY]/merge_sort
Once the repository is cloned, you can run the programs. To do this, run this command:
ruby [NAME_OF_PROGRAM].rb
The program names are: fibs.rb, fibs_rec.rb and merge_sort.rb
PicFive is a web-based game where users must take a picture that falls into as many of the five categories as possible. After submitting the picture, the player is given a score that is determined by the degree to which the photo matches each of the categories. The results are then stored in a database, and the top 10 scores are presented to the player.
The game implements Computer Vision and Machine Learning through Clarifai API.
The game was developed during UofT Hacks IV in January, 2017. Our initial goal was to develop an application using the ClairifaiAPI, which allows us to process images in highly meaningful ways using image recognition. Ultimately, we created a social game thet encourages exploration and creativity.
To improve this project, we would improve the user interface and experience. Authentication would be implemented, both locally and using common social media such as Facebook, Twitter, and Google. Users would have the ability to share their scores and invite their friends to participate in the daily challenge.
To run this locally:
Clone this repo
Make sure you have the latest release of node and npm
Run npm install and then nodemon
The resolver endpoint will now be accessible at: http://localhost:5000/
Demonstration
The front of the website should look something like this.
Note that the five keywords are “Computer”, “Can”, “Glasses”, “Girl”, and “President”.
Find an image that best matches these keywords as accurately as possible.
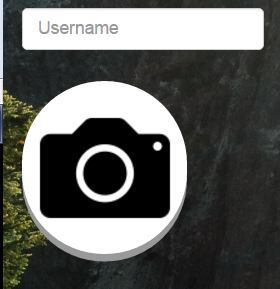
Once you found an image, you can upload it on the bottom left corner of the page, by clicking the camera icon.
You can optionally insert a username so that your username can be associated with your score if you make it to the leaderboards.
Now wait for a short amount of time for your score to be processed.
Once your score is processed, a leaderboard screen will appear.
In this case, the username was “Testing”, and the calculated score was 17.
17 was not high enough to reach the leaderboards, so the score will not be displayed on this page.
If your score is high enough, you will be placed on the leaderboards!
This is essentially how PicFive works. Try to make it onto the leaderboards by uploading an image which is as relevant as possible to the 5 keywords.
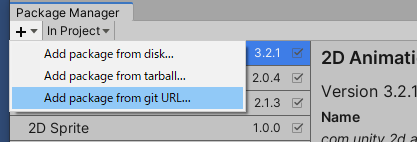
or add "com.megumin.explosion4unity": "https://github.com/KumoKyaku/Megumin.Explosion.git?path=Megumin.UnityPackage/Packages/megumin.explosion4unity" to Packages/manifest.json.
If you want to set a target version, uses the *.*.* release tag so you can specify a version like #2.1.0. For example https://github.com/Cysharp/UniTask.git?path=src/UniTask/Assets/Plugins/UniTask#2.1.0.
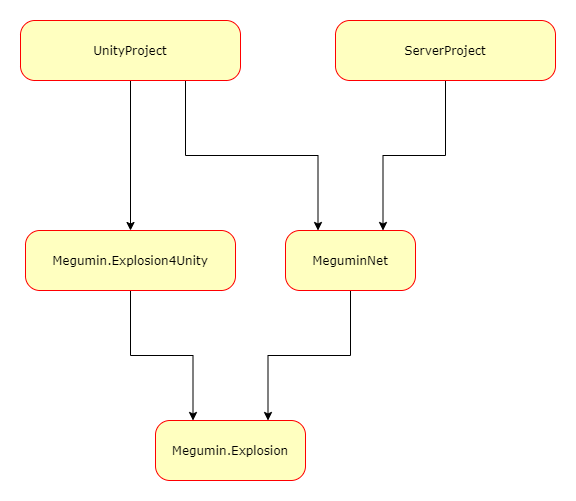
当前版本目标框架为netstandard2.1
error CS1705: Assembly ‘Megumin.Explosion’ with identity ‘Megumin.Explosion, Version=0.1.4.0, Culture=neutral, PublicKeyToken=83a041e0a8636db9’ uses ‘netstandard, Version=2.1.0.0, Culture=neutral, PublicKeyToken=cc7b13ffcd2ddd51’ which has a higher version than referenced assembly ‘netstandard’ with identity ‘netstandard, Version=2.0.0.0, Culture=neutral, PublicKeyToken=cc7b13ffcd2ddd51
Unity2021.2之前的版本请使用 vnetstandard2.0版本,后续不会在维护旧版本.
Add "com.megumin.explosion4unity": "https://github.com/KumoKyaku/Megumin.Explosion.git?path=Megumin.UnityPackage/Packages/megumin.explosion4unity#vnetstandard2.0" to Packages/manifest.json.
This project is an independent approach to acquire patient data from Philips patient monitors via network interface. It has no association with the Philips corporation.
The Python-module published here emphasizes especially ease of use, giving researchers an easy way to interact with Philips patient monitors.
An attempt was made to use Python Standard Library modules as much as possible.
This application is for research use only and may not be used for diagnostic or therapeutic applications.
Limitations
In theory this module should work with X2, MP Series, MX Series, FM Series of Philips patient monitors. Though this project was developed and tested only using a MP70-type patient monitor. The communication protocol was reverse engineered using mainly packet sniffing and to some extent the (in my opinion) poorly written documentation of the manufacturer, that can be found on the internet. Not all data is parsed completely (as it should be done) and to some extent the communication is purely based on empiric packet sniffing. So there is a chance it might not work with certain patient monitors or firmware versions.
All in all, the code is still very raw and still contains many debugging functions that have only been commented out. If anyone wants to take the time to improve it, you are very welcome.
There are two flags in the init method that can be set to True to make the module more verbose and to help narrow down problems.
Options for debugging:
debug_info
debug_error
Also refer to somno/einstein here on github for more useful information on communication with Philips patient monitors.
Important methodes of piv_data_source.py
piv_data_source.init(IP)
When creating a new insctance of piv_data_source the correct IP of the patient monitor is required as parameter.
piv_data_source.start_client()
Starts the UDP-client thread and begins to acquire data from the monitor.
piv_data_source.start_watchdog()
Starts the additional watchdog, that restarts the connection when exceptions occur. The connection-watchdog is automatically startet when starting the UDP-client. If you don’t use the watchdog you will have to monitor the current connection yourself. This is necessary because the monitor sometimes terminates the connection spontaneously or does not process requests correctly.
piv_data_source.halt_client()
Terminates the connection, the UDP-client and the start_watchdog. Should be called before the object is deleted to terminate the connection correctly.
piv_data_source.get_vital_signs()
Returns a list with patient vital signs.
piv_data_source.get_patient_data()
Returns a list with patient admission information.
piv_data_source.refresh_patient_data()
Reads patient admission information again to check for changes (usually it is only read once when a new connection is started).
Returns a boolean whether the connection is working properly.
Using the Module piv_data_source.py
A simple example how to use the piv_data_source module. It starts a connection, reades some data and terminates the connection.
frompiv_data_sourceimportpiv_data_source# time module is just used to create some delay to give the monitor time to respondimporttime# Insert the correct IP of the patient monitor here!device=piv_data_source("127.0.0.1")
# Start clientdevice.start_client()
# delay 15 seconds to give the monitor time to gather datatime.sleep(15)
# read patient information and vital signsprint(device.get_patient_data())
print(device.get_vital_signs())
# Terminate connectiondevice.halt_client()
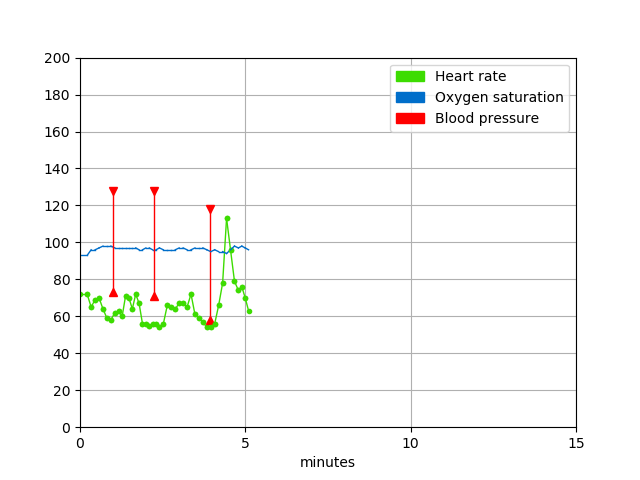
Plotting data
In the directory plotting_example you can find a simple tool that plots vital sign data for testing, using matplotlib.
AudioVerse is a fully responsive eCommerce website built with React, Next.js, integrated Stripe payments,using Sanity as the backend and is deployed on Vercel.
The purpose of this project was to gain experience and start learning Next.js, as well as to learn how to integrate Stripe payments and backend management with Sanity, both of which were important parts of this project.
The integration with Stripe payments is a crucial feature for the eCommerce website, as it allows secure and efficient online transactions.
Using Sanity as the backend for this project allows for flexible and efficient content management.
Features
Fully responsive design for easy access and use across all devices
Fast and intuitive user interface to enhance user experience
Integration with Stripe payments for secure and efficient online transactions
A shopping cart to keep track of selected products
A checkout page to complete purchases and finalize transactions
Integration with Sanity backend for easy product management
Suggestions for future developments…
Local Storage integration
Search Bar
Product Categoriation
Testing the App
Please note that the AudioVerse eCommerce website has been developed in testing mode and no real payments will be processed. Stripe ensured you can fully experience all the features of the website – please use the following test credit card details on the checkout page:
Aplicación de escritorio que permite administrar un catálogo de productos. Se utilizó .NET Framework con C#.
Funcionalidades:
Realizar operaciones CRUD (Crear, Leer, Actualizar, Eliminar) sobre los productos. Es posible obtener información de los productos, eliminar los existentes, actualizar y agregar nuevos.
Conexión a una base de datos Microsoft SQL Server para almacenar y gestionar los productos.
La arquitectura de la aplicación se basa en un modelado en capas, lo que mejora la organización y escalabilidad del código.
Se utiliza programación orientada a objetos (POO) para estructurar el código de manera eficiente.
La interfaz gráfica de usuario (GUI) fue desarrollada utilizando Windows Forms.
Tecnologías utilizadas:
Lenguaje: C# con .NET Framework
Base de Datos: Microsoft SQL Server
Arquitectura: Modelado en capas
GUI: Windows Forms
Paradigma: Programación orientada a objetos (POO)
—
Product Catalog – Desktop Application
A desktop application to manage a product catalog. It was built using .NET Framework with C#.
Features:
Perform CRUD operations (Create, Read, Update, Delete) on products. You can retrieve product information, delete existing ones, update them, and add new products.
The application connects to a Microsoft SQL Server database to store and manage product data.
The architecture is based on a layered model, enhancing code organization and scalability.
Object-Oriented Programming (OOP) principles are applied to structure the code efficiently.
The Graphical User Interface (GUI) was developed using Windows Forms.
Ynab is a personal finance app designed to help you manage your money better by budgeting upwards and maintaining financial discipline. This application allows you to track your income and expenses, set a default currency for transactions, create and manage categories, and view transaction history within a specified date range.
Features
Transaction Management: Add, edit, and delete transactions with ease. View your transaction history filtered by date range.
Budgeting: Categorize your income and expenses to maintain a disciplined budget. Create custom categories for better organization.
Currency Settings: Set and manage your default currency for all transactions.
Date Range Picker: Easily select and view transactions within a specific date range.
Data Export: Export your transaction history to CSV format for offline access and analysis.
Getting Started
Prerequisites
Node.js (v14 or higher)
pnpm(v8 or higher) or npm (v6 or higher) or Yarn (v1.22 or higher)
PostgreSQL (or any other SQL database)
Installation
Clone the repository:
git clone https://github.com/yourusername/ynab.git
cd ynab
Install dependencies:
pnpm install
 # or
npm install
# or
yarn install
Set up the environment variables. Create a .env file in the root directory and add the following:
Open your browser and navigate to http://localhost:3000.
Deployment
For deploying the app to production, follow the documentation of your preferred hosting service (Vercel, Netlify, Heroku, etc.). Make sure to set the necessary environment variables in your hosting service’s dashboard.
Contributing
Contributions are welcome! If you’d like to contribute, please fork the repository and use a feature branch. Pull requests are warmly welcome.
Fork the repository.
Create your feature branch (git checkout -b feature/new-feature).
Commit your changes (git commit -m 'Add some feature').
Push to the branch (git push origin feature/new-feature).
Create a new Pull Request.
License
This project is licensed under the MIT License. See the LICENSE file for details.
nanoMODBUS – A compact MODBUS RTU/TCP C library for embedded/microcontrollers
If you found this library useful, buy me a coffee on
nanoMODBUS is a small C library that implements the Modbus protocol. It is especially useful in embedded and
resource-constrained systems like microcontrollers.
Its main features are:
Compact size
Only ~2000 lines of code
Client and server code can be disabled, if not needed
No dynamic memory allocations
Transports:
RTU
TCP
Roles:
Client
Server
Function codes:
01 (0x01) Read Coils
02 (0x02) Read Discrete Inputs
03 (0x03) Read Holding Registers
04 (0x04) Read Input Registers
05 (0x05) Write Single Coil
06 (0x06) Write Single Register
15 (0x0F) Write Multiple Coils
16 (0x10) Write Multiple registers
20 (0x14) Read File Record
21 (0x15) Write File Record
23 (0x17) Read/Write Multiple registers
43/14 (0x2B/0x0E) Read Device Identification
Platform-agnostic
Requires only C99 and its standard library
Data transport read/write functions are implemented by the user
User-definable CRC function for better performance
Broadcast requests and responses
At a glance
#include<stdio.h>#include"nanomodbus.h"#include"my_platform_stuff.h"intmain(intargc, char*argv[]) {
// Set up the TCP connectionvoid*conn=my_connect_tcp(argv[1], argv[2]);
if (!conn) {
fprintf(stderr, "Error connecting to server\n");
return1;
}
// my_transport_read() and my_transport_write() are implemented by the user nmbs_platform_confplatform_conf;
nmbs_platform_conf_create(&platform_conf);
platform_conf.transport=NMBS_TRANSPORT_TCP;
platform_conf.read=my_transport_read;
platform_conf.write=my_transport_write;
platform_conf.arg=conn; // Passing our TCP connection handle to the read/write functions// Create the modbus clientnmbs_tnmbs;
nmbs_errorerr=nmbs_client_create(&nmbs, &platform_conf);
if (err!=NMBS_ERROR_NONE) {
fprintf(stderr, "Error creating modbus client\n");
return1;
}
// Set only the response timeout. Byte timeout will be handled by the TCP connectionnmbs_set_read_timeout(&nmbs, 1000);
// Write 2 holding registers at address 26uint16_tw_regs[2] = {123, 124};
err=nmbs_write_multiple_registers(&nmbs, 26, 2, w_regs);
if (err!=NMBS_ERROR_NONE) {
fprintf(stderr, "Error writing register at address 26 - %s", nmbs_strerror(err));
return1;
}
// Read 2 holding registers from address 26uint16_tr_regs[2];
err=nmbs_read_holding_registers(&nmbs, 26, 2, r_regs);
if (err!=NMBS_ERROR_NONE) {
fprintf(stderr, "Error reading 2 holding registers at address 26 - %s\n", nmbs_strerror(err));
return1;
}
// Close the TCP connectionmy_disconnect(conn);
return0;
}
Installation
Manual
Just copy nanomodbus.c and nanomodbus.h inside your application codebase.
CMake project
nanomodbus supports library linking by using CMake.
FetchContent_Declare(
nanomodbusGIT_REPOSITORYhttps://github.com/debevv/nanoMODBUSGIT_TAGmaster# or the version you wantGIT_SHALLOWTRUE
)
FetchContent_MakeAvailable(nanomodbus)
#...add_executable(your_programsource_codes)
target_link_libraries(your_programnanomodbus)
API reference
API reference is available in the repository’s GitHub Pages.
Platform functions
nanoMODBUS requires the implementation of 2 platform-specific functions, defined as function pointers when creating a
client/server instance.
These are your platform-specific functions that read/write data to/from a serial port or a TCP connection.
Both methods should block until either:
count bytes of data are read/written
the byte timeout, with byte_timeout_ms >= 0, expires
A value < 0 for byte_timeout_ms means infinite timeout.
With a value == 0 for byte_timeout_ms, the method should read/write once in a non-blocking fashion and return
immediately.
Their return value should be the number of bytes actually read/written, or < 0 in case of error.
A return value between 0 and count - 1 will be treated as if a timeout occurred on the transport side. All other
values will be treated as transport errors.
Callbacks and platform functions arguments
Server callbacks and platform functions can access arbitrary user data through their void* arg argument. The argument
is useful, for example, to pass the connection a function should operate on.
Their initial values can be set via the nmbs_set_callbacks_arg and nmbs_set_platform_arg API methods.
Tests and examples
Tests and examples can be built and run on Linux with CMake:
mkdir build &&cd build
cmake ..
make
Please refer to examples/arduino/README.md for more info about building and running Arduino examples.
Misc
To reduce code size, you can define the following #defines:
NMBS_CLIENT_DISABLED to disable all client code
NMBS_SERVER_DISABLED to disable all server code
To disable individual server callbacks, define the following:
NMBS_SERVER_READ_COILS_DISABLED
NMBS_SERVER_READ_DISCRETE_INPUTS_DISABLED
NMBS_SERVER_READ_HOLDING_REGISTERS_DISABLED
NMBS_SERVER_READ_INPUT_REGISTERS_DISABLED
NMBS_SERVER_WRITE_SINGLE_COIL_DISABLED
NMBS_SERVER_WRITE_SINGLE_REGISTER_DISABLED
NMBS_SERVER_WRITE_MULTIPLE_COILS_DISABLED
NMBS_SERVER_WRITE_MULTIPLE_REGISTERS_DISABLED
NMBS_SERVER_READ_FILE_RECORD_DISABLED
NMBS_SERVER_WRITE_FILE_RECORD_DISABLED
NMBS_SERVER_READ_WRITE_REGISTERS_DISABLED
NMBS_SERVER_READ_DEVICE_IDENTIFICATION_DISABLED
NMBS_STRERROR_DISABLED to disable the code that converts nmbs_errors to strings
NMBS_BITFIELD_MAX to set the size of the nmbs_bitfield type, used to store coil values (default is 2000)
Debug prints about received and sent messages can be enabled by defining NMBS_DEBUG
Use Vue.js to implement a small SPA note-taking application.
Each note has a title and a todo list of Todo items. Each Todo item consists of a checkbox and associated text of todo task.
The application consists of only 2 pages.
The main page displays a list of all notes. For each note, a title and todos are displayed, without the ability to edit them.
Actions on the main page:
go to create a new note
go to edit existed note
delete note (confirmation required)
The note edit page allows you to edit a specific note, mark Todo items, and then save the changes. Actions with a note:
save changes
undo editing (confirmation required)
delete (confirmation required)
undo the change made
redo undo
Actions with Todo items:
to add
delete
edit text
mark as done
Functional requirements:
All actions on the site should take place without reloading the page.
Confirmation of actions (delete a note) is performed using a dialog box.
The interface must meet the usability requirements.
After reloading the page, the state of the note list should be preserved.
You can neglect text editing inconsistencies with undo/redo buttons and similar actions with keyboard shortcuts (Ctrl + Z, Command + Z, etc.).
Technical requirements:
Dialog boxes should be implemented without using “alert”, “prompt” and “confirm”.
JavaScript or TypeScript can be used as the development language.
Use Webpack as a bundler if needed.
Layout should be done without using UI libraries (for example Vuetify).
Responsiveness is optional, but encouraged.
The application logic should be broken down into a reasonable number of self-contained Vue components.
Particular attention should be paid to the following points:
The code should be written clearly and accurately, with the observance of tabulation and other writing elements, without unnecessary elements and functions that are not related to the functionality of the test task, provided with understandable comments.
Readability and basic architecture.
Cleanliness and cleanliness of the code is an equally important factor. The code should be written in a uniform style (preferably in the one recommended for a particular language). Also, cleanliness includes the absence of copy-paste and duplication of logic.
The test task should be provided in the following form:
Link to public repository (GitHub, BitBucket, GitLab) with source code.
Link to the site for testing the functionality. Or Dockerfile and docker-compose.yaml, which allow you to deploy locally using docker-compose up a working copy of your site.