$ mailscript login... You should see a browser window open prompting you to login to your Mailscript account. The daemon will handle the rest upon completion
O FastApi é um projeto de backend que facilita a inclusão de rotas em uma aplicação REST, permitindo a criação rápida de endpoints CRUD com operações básicas. O projeto utiliza anotações nos comentários (DocBlocks) dos controladores para definir as rotas, inspirado no estilo do FastAPI em Python. O banco de dados utilizado é o SQLite para facilitar os testes e a configuração inicial. Este projeto não possui frontend, focando apenas no backend.
Requisitos
PHP 7.4+ (recomendado PHP 8.0+)
Composer
Banco de dados SQLite
Postman ou Thunder Client (ou qualquer cliente de API REST)
Navegue até a pasta src (cd src) e inicie o servidor:
php -S localhost:8000
as classes controllers criadas precisam ter os comentários como o modelo:
<?php
namespace Fast\Api\Controllers;

use Fast\Api\Models\User;
use Fast\Api\Repositories\UserRepository;

class UserController {
    private $userRepository;

    public function __construct() {
        $this->userRepository = new UserRepository();
    }

    /**
     * @GET("/users")
     */
    public function getAllUsers() {
        // Retorna todos os usuários
    }

    /**
     * @GET("/users/{id}")
     */
    public function getUserById($id) {
        // Retorna um usuário pelo ID
    }

    /**
     * @POST("/users")
     */
    public function createUser() {
        // Cria um novo usuário
    }

    /**
     * @PUT("/users/{id}")
     */
    public function updateUser($id) {
        // Atualiza um usuário existente
    }

    /**
     * @DELETE("/users/{id}")
     */
    public function deleteUser($id) {
        // Deleta um usuário existente
    }
}
Endpoints Disponíveis
O projeto inclui sete operações CRUD nas mesmas rotas, variando apenas o método HTTP. Veja abaixo os endpoints disponíveis:
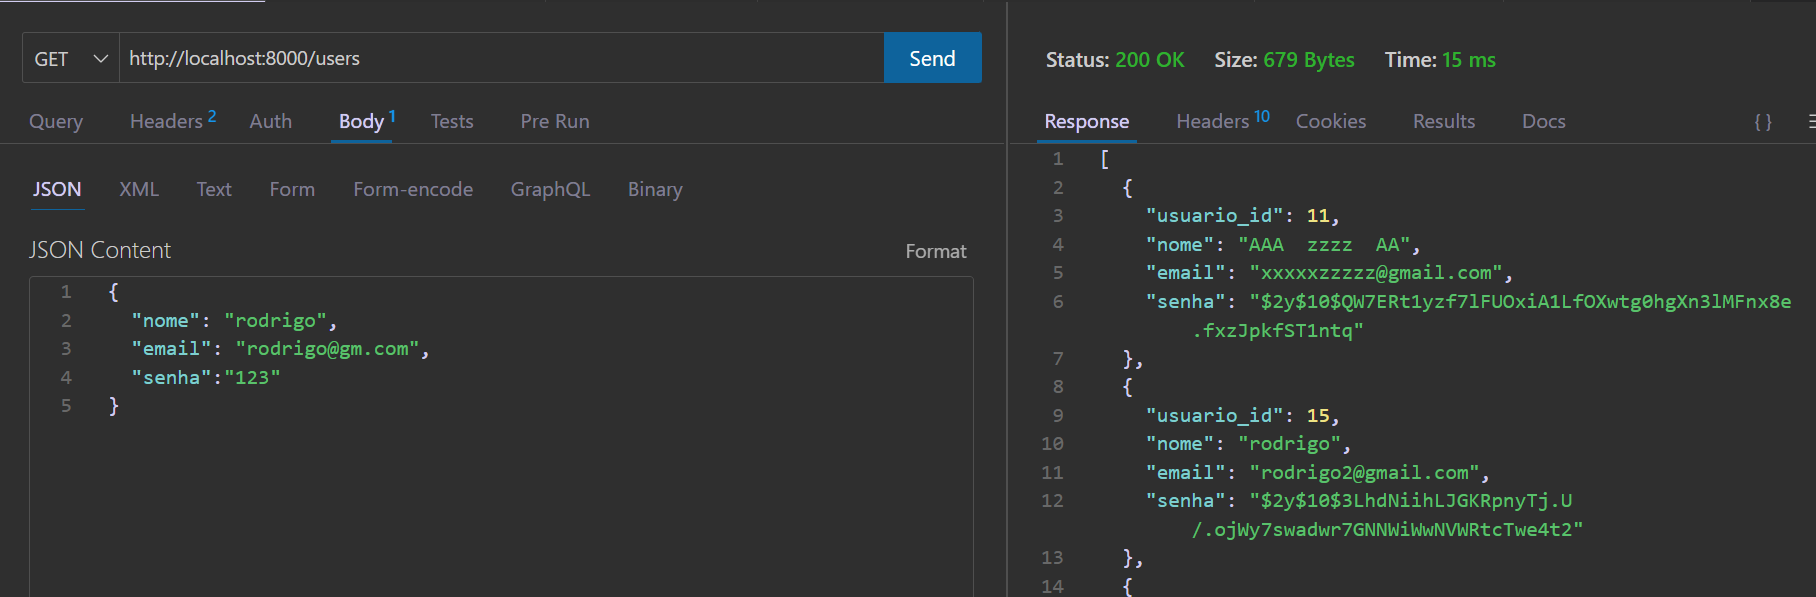
GET /users – Retorna todos os usuários
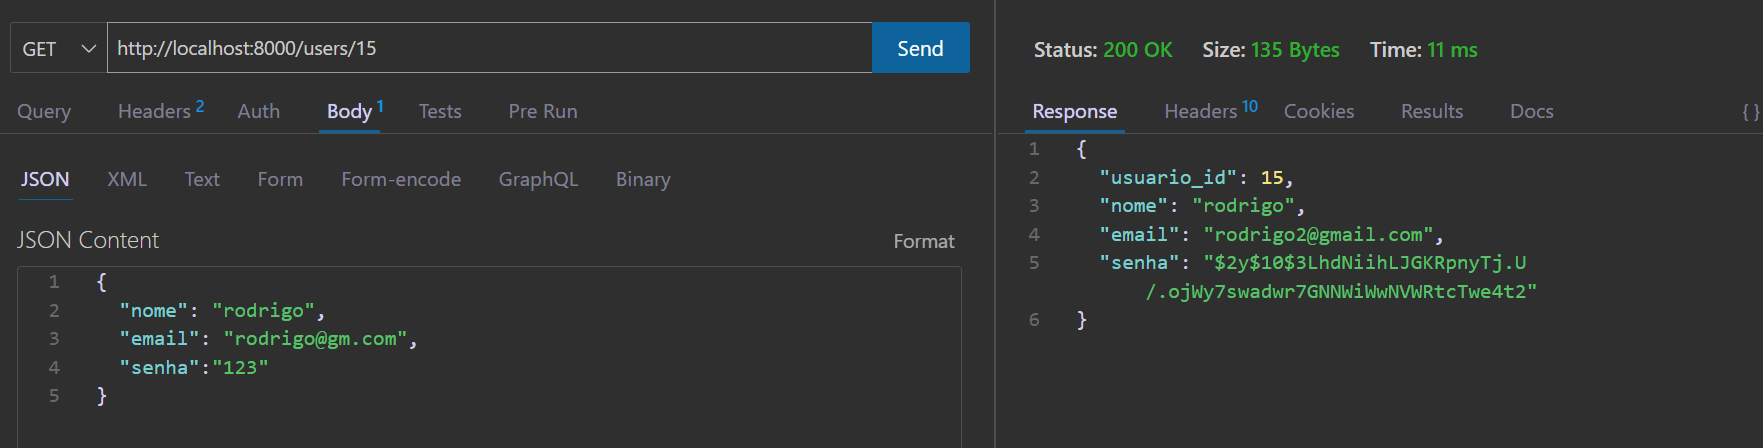
GET /users/{id} – Retorna um usuário específico pelo ID
GET /users/nome/rodrigo – Retorna um usuário específico pelo nome
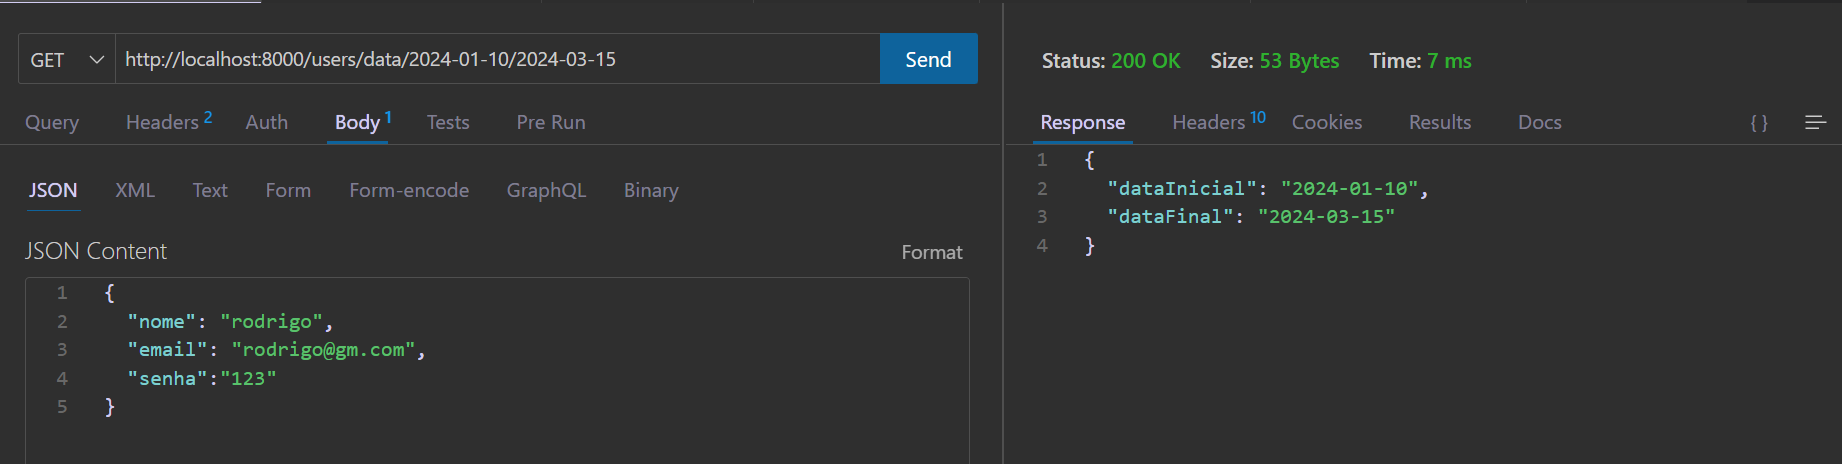
GET /users/data/2024-01-10/2024-03-15 -pode receber dois argumentos para relatórios
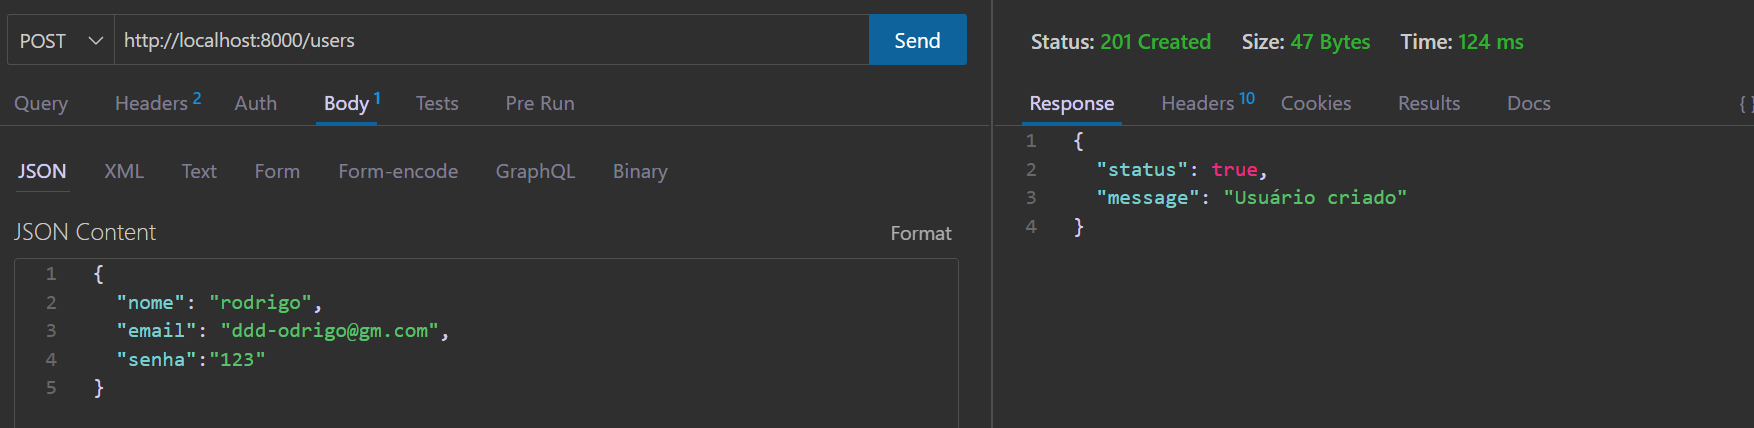
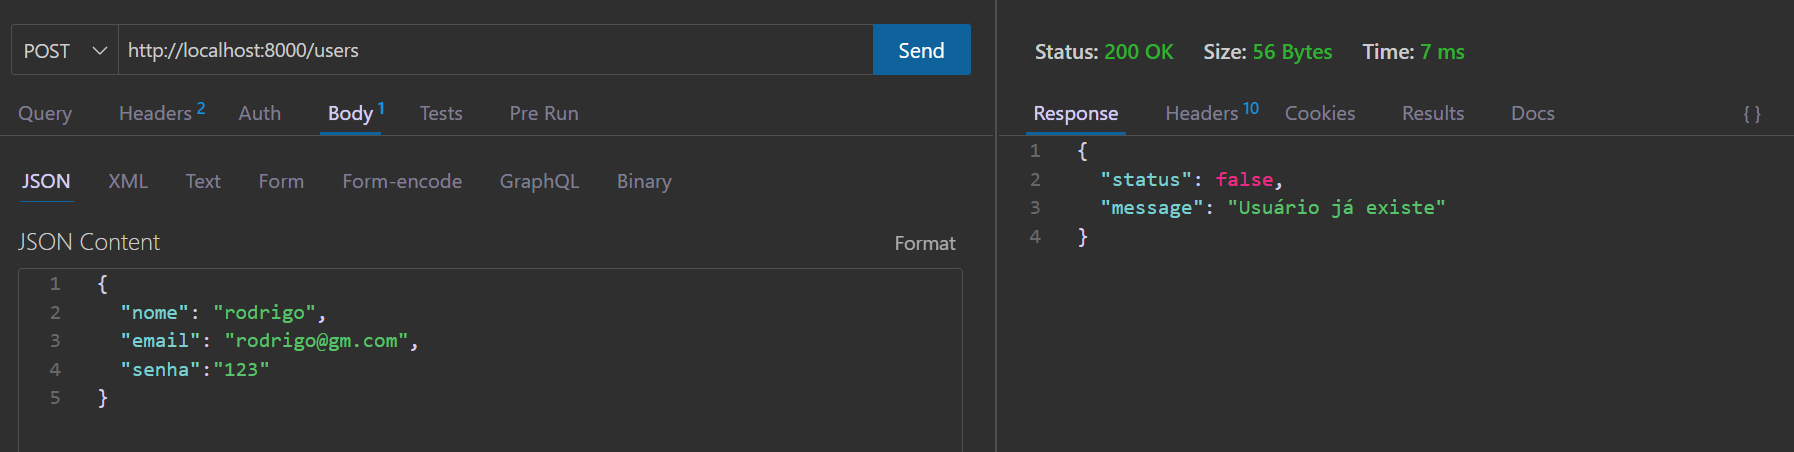
POST /users – Cria um novo usuário
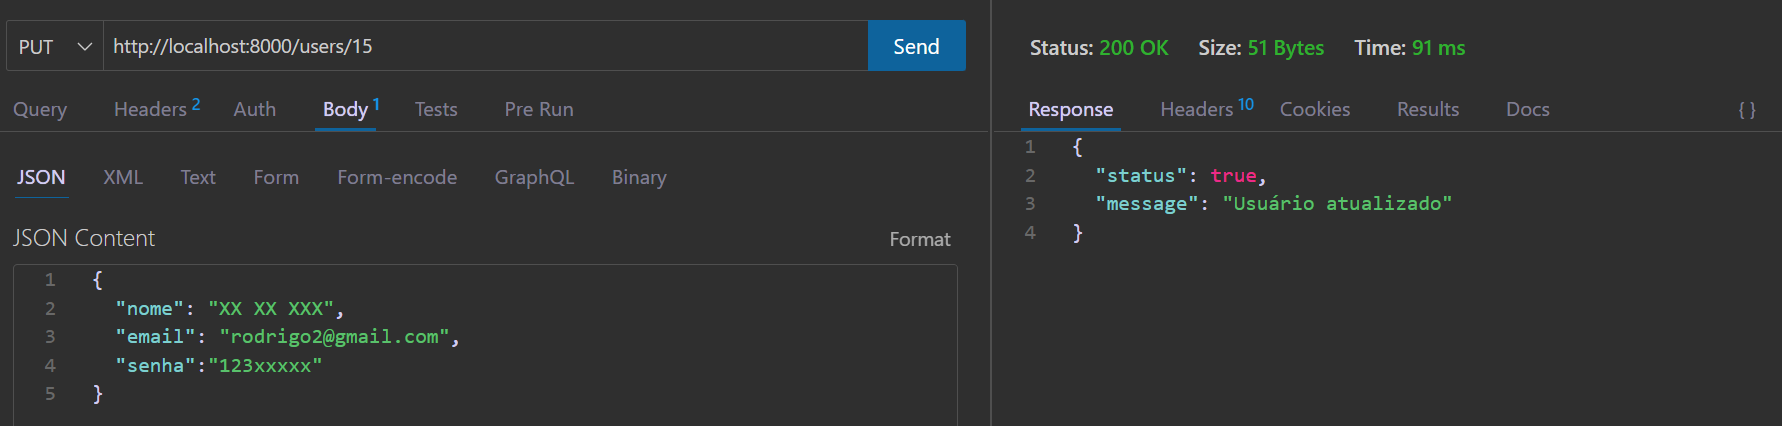
PUT /users/{id} – Atualiza um usuário existente pelo ID
DELETE /users/{id} – Deleta um usuário existente pelo ID
Exemplo de Requisição com JSON
Para testar os endpoints, você pode usar o Postman ou Thunder Client.
As rotas são definidas diretamente nos métodos dos controladores usando anotações nos DocBlocks.
O DocBlockRouter é responsável por ler essas anotações e registrar as rotas.
Não é necessário registrar manualmente os controladores; o sistema carrega automaticamente todos os controladores presentes na pasta /Controllers.
As rotas podem conter parâmetros, como {id}, que serão passados como argumentos para os métodos.
Exemplo de Parâmetros na Rota
/**
 * @GET("/users/{id}")
 */
public function getUserById($id) {
    // $id será o valor capturado da URL
}
Dependências
O projeto utiliza a seguinte dependência:
phpdocumentor/reflection-docblock: Utilizada para interpretar as anotações nos DocBlocks.
O arquivo index.php é responsável por inicializar o roteamento e processar as requisições:
<?php
namespace Fast\Api;

use Fast\Api\Http\HttpHeader;
use Fast\Api\Rotas\DocBlockRouter;

require_once '../vendor/autoload.php';

// Define os cabeçalhos HTTP padrão
HttpHeader::setCabecalhosPadrao();

// Trata requisições OPTIONS para CORS
if ($_SERVER['REQUEST_METHOD'] === 'OPTIONS') {
    http_response_code(204);
    exit();
}

// Obtém o método HTTP e a URI da requisição
$metodoHttp = $_SERVER['REQUEST_METHOD'];
$uri = $_SERVER['REQUEST_URI'];

// Cria uma instância do roteador
$roteador = new DocBlockRouter();

// Define o caminho base e o namespace para os controladores
$caminhoControladores = __DIR__ . '/../src/Controllers';
$namespaceBase = 'Fast\\Api\\Controllers';

// Obtém todas as classes de controladores dinamicamente
$classesControladoras = obterClassesControladoras($caminhoControladores, $namespaceBase);

// Passa todas as classes de controladores para o roteador
foreach ($classesControladoras as $classeControladora) {
    $roteador->passaControlador($classeControladora);
}

// Resolve a rota com base no método HTTP e URI
$roteador->resolve($metodoHttp, $uri);

// Função para obter todas as classes de controladores
function obterClassesControladoras($caminhoControladores, $namespaceBase) {
    $classesControladoras = [];

    $iterador = new \RecursiveIteratorIterator(
        new \RecursiveDirectoryIterator($caminhoControladores)
    );

    foreach ($iterador as $arquivo) {
        if ($arquivo->isFile() && $arquivo->getExtension() === 'php') {
            // Obtém o caminho do arquivo relativo ao caminho dos controladores
            $caminhoRelativo = substr($arquivo->getPathname(), strlen($caminhoControladores));
            // Remove os separadores de diretório iniciais
            $caminhoRelativo = ltrim($caminhoRelativo, DIRECTORY_SEPARATOR);
            // Remove a extensão '.php' do arquivo
            $caminhoRelativo = substr($caminhoRelativo, 0, -4);
            // Substitui os separadores de diretório pelos separadores de namespace
            $parteNomeClasse = str_replace(DIRECTORY_SEPARATOR, '\\', $caminhoRelativo);
            // Monta o nome completo da classe, incluindo o namespace
            $nomeClasse = $namespaceBase . '\\' . $parteNomeClasse;

            // Verifica se a classe existe (autoload)
            if (!class_exists($nomeClasse)) {
                // Inclui o arquivo para carregar a classe
                require_once $arquivo->getPathname();
            }

            // Se a classe existe após inclusão, adiciona à lista de classes controladoras
            if (class_exists($nomeClasse)) {
                $classesControladoras[] = $nomeClasse;
            }
        }
    }

    return $classesControladoras;
}
Arquivo: Rotas/DocBlockRouter.php (comentado em detalhes)
<?php
namespace Fast\Api\Rotas;

use ReflectionClass;
use ReflectionMethod;
use phpDocumentor\Reflection\DocBlockFactory;
class DocBlockRouter {
    private array $rotas = [];
    public function passaControlador(string $classeControladora) {
        // Cria uma reflexão da classe controladora
        $reflexaoControladora = new ReflectionClass($classeControladora);
        // Obtém todos os métodos públicos da classe controladora
        $metodos = $reflexaoControladora->getMethods(ReflectionMethod::IS_PUBLIC);
        // Cria uma instância da fábrica de DocBlocks
        $fabricaDocBlock = DocBlockFactory::createInstance();
        // Percorre cada método público da classe controladora
        foreach ($metodos as $metodo) {
            // Obtém o comentário do DocBlock do método
            $comentarioDoc = $metodo->getDocComment();
            if ($comentarioDoc) {
                // Cria um objeto DocBlock a partir do comentário
                $docBlock = $fabricaDocBlock->create($comentarioDoc);
                $metodosHttp = ['GET', 'POST', 'PUT', 'DELETE', 'PATCH', 'OPTIONS'];
                // Verifica se o DocBlock possui alguma das tags HTTP
                foreach ($metodosHttp as $metodoHttp) {
                    if ($docBlock->hasTag($metodoHttp)) {
                        // Obtém a primeira tag correspondente ao método HTTP
                        $tagRota = $docBlock->getTagsByName($metodoHttp)[0];
                        // Obtém o conteúdo da descrição da tag (ex: '("/usuarios")')
                        $conteudo = $tagRota->getDescription()->render();
                        // Extrai o caminho da rota a partir do conteúdo da tag
                        preg_match('/\("(.*)"\)/', $conteudo, $correspondencias);
                        $caminho = $correspondencias[1] ?? '';
                        // Armazena a rota no array de rotas, associando o método HTTP, caminho e ação
                        $this->rotas[$metodoHttp][$caminho] = [$classeControladora, $metodo->getName()];
                    }
                }
            }
        }
    }
    public function resolve($metodoHttp, $uri) {
        // Verifica se existem rotas para o método HTTP solicitado
        if (!isset($this->rotas[$metodoHttp])) {
            http_response_code(405);
            echo json_encode(['status' => false, 'message' => 'Método não permitido']);
            exit();
        }
        // Obtém o caminho da URI (sem query strings)
        $uri = parse_url($uri, PHP_URL_PATH);
        // Percorre cada rota registrada para o método HTTP
        foreach ($this->rotas[$metodoHttp] as $rota => $acao) {
            // Substitui os parâmetros da rota por expressões regulares nomeadas
            $padrao = preg_replace_callback('/\{([a-zA-Z_][a-zA-Z0-9_]*)\}/', function ($matches) {
                $nomeParametro = $matches[1];
                // Para parâmetros genéricos, permite qualquer sequência que não contenha "https://github.com/"
                return '(?P<' . $nomeParametro . '>[^/]+)';
            }, $rota);
            // Define o padrão como uma expressão regular completa
            $padrao = '#^' . $padrao . '$#u';
            // Verifica se a URI corresponde ao padrão da rota
            if (preg_match($padrao, $uri, $correspondencias)) {
                // Cria uma instância da classe controladora
                $instanciaControladora = new $acao[0]();
                $nomeMetodo = $acao[1];
                // Filtra os parâmetros nomeados capturados na expressão regular
                $parametros = array_filter(
                    $correspondencias,
                    fn($chave) => is_string($chave),
                    ARRAY_FILTER_USE_KEY
                );
                // Obtém os dados do corpo da requisição (se houver)
                $dados = json_decode(file_get_contents('php://input'), true);
                // Obtém os parâmetros esperados pelo método através da reflexão
                $metodoRefletido = new ReflectionMethod($instanciaControladora, $nomeMetodo);
                $parametrosMetodo = $metodoRefletido->getParameters();
                $argumentos = [];
                // Prepara os argumentos a serem passados para o método, na ordem correta
                foreach ($parametrosMetodo as $parametro) {
                    $nome = $parametro->getName();
                    if (isset($parametros[$nome])) {
                        $argumentos[] = $parametros[$nome];
                    } elseif ($nome === 'dados') {
                        $argumentos[] = $dados;
                    } else {
                        $argumentos[] = null;
                    }
                }
                // Chama o método da controladora com os argumentos obtidos
                return call_user_func_array([$instanciaControladora, $nomeMetodo], $argumentos);
            }
        }
        // Se nenhuma rota corresponder, retorna erro 404
        http_response_code(404);
        echo json_encode(['status' => false, 'message' => 'Rota não encontrada']);
        exit();
    }
}
A gRPC service to advertise content addressable data onto IPNI.
Install
To install depute CLI directly via Golang, run:
$ go install github.com/ipni/depute/cmd/depute@latest
Usage
$ depute -h
Usage of depute:
Usage of ./depute:
  -directAnnounceURL value
    	Indexer URL to send direct http announcement to. Multiple OK
  -grpcListenAddr string
    	The gRPC server listen address. (default "0.0.0.0:40080")
  -grpcTlsCertPath string
    	Path to gRPC server TLS Certificate.
  -grpcTlsKeyPath string
    	Path to gRPC server TLS Key.
  -httpListenAddr string
    	Address to listen on for publishing advertisements over HTTP.
  -libp2pIdentityPath string
    	Path to the marshalled libp2p host identity. If unspecified a random identity is generated.
  -libp2pListenAddrs string
    	Comma separated libp2p host listen addrs. If unspecified the default listen addrs are used at ephemeral port.
  -logLevel string
    	Logging level. Only applied if GOLOG_LOG_LEVEL environment variable is unset. (default "info")
  -noPubsub
    	Disable pubsub announcements of new advertisements.
  -pubAddr value
    	Address to tell indexer where to retrieve advertisements. Multiple OK
  -retrievalAddrs string
    	Comma separated retrieval multiaddrs to advertise. If unspecified, libp2p host listen addrs are used.
  -topic string
    	Sets the topic that pubsub messages are send on. (default "/indexer/ingest/mainnet")
Run Server Locally
To run the depute HTTP server locally, execute:
$ go run ./cmd/depute
The above command starts the gRPC server exposed on default listen address: http://localhost:40080.
To shutdown the server, interrupt the terminal by pressing Ctrl + C
Organic First is a website serves as a valuable resource to learn more about organic farming and aims to raise awareness about its importance in sustainable agriculture. It also provides a platform for institutions to connect with us for conducting workshops and educational programs on Organic Farming.
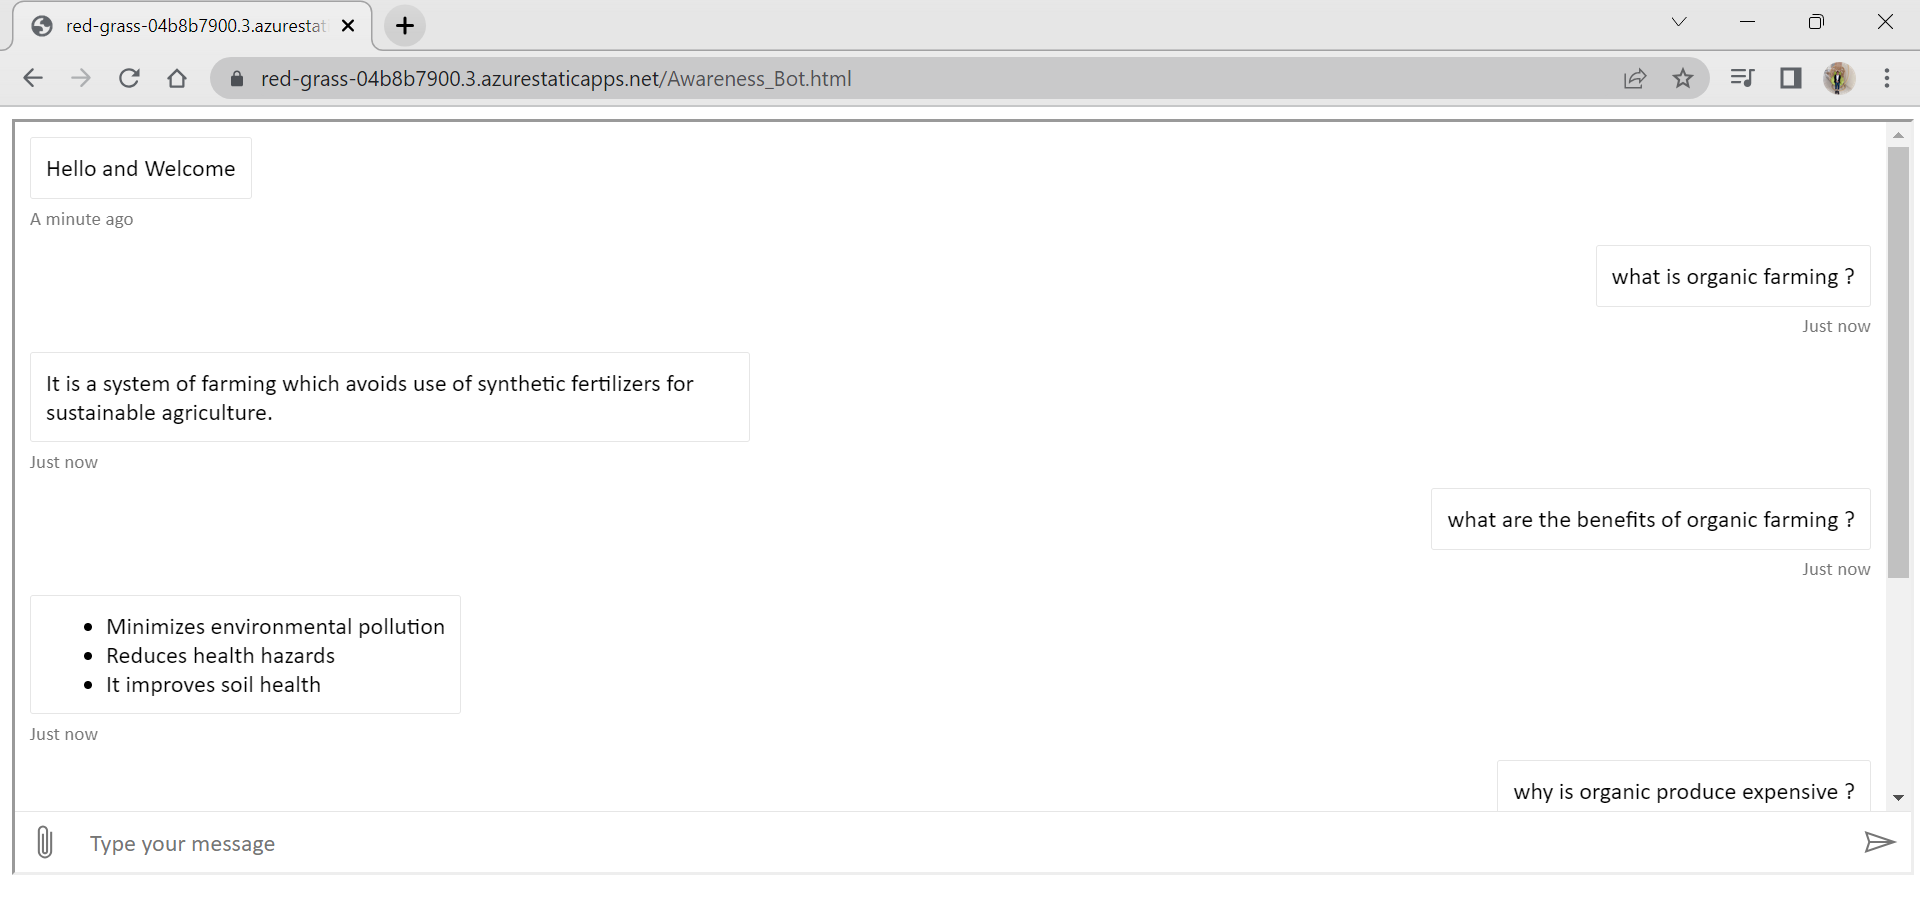
Educational Resources: Explore a wide range of resources on organic farming techniques, sustainable practices, and the benefits of organic agriculture and also use Awareness bot
Awareness Building: Learn about the importance of organic farming in promoting environmental sustainability, biodiversity, and the health benefits of consuming organic produce.
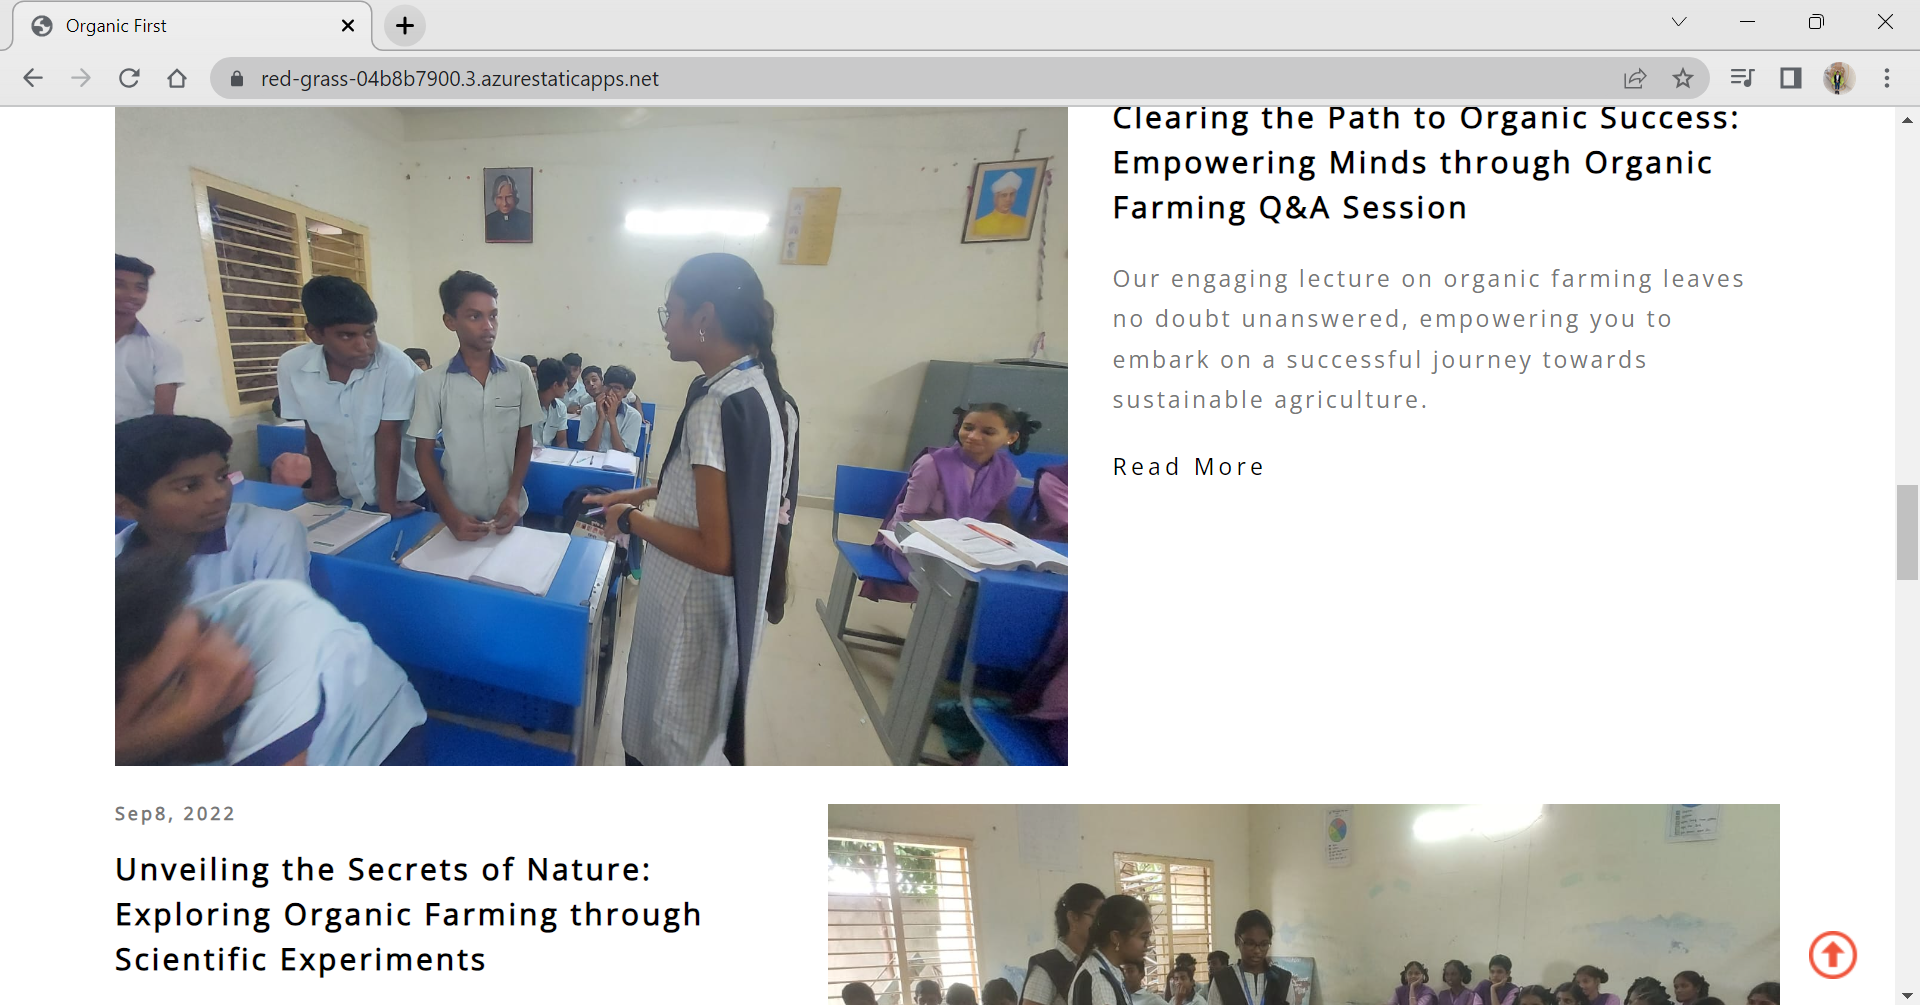
Institutional Collaboration: Institutions interested in promoting organic farming can connect with us to organize workshops, training sessions, and educational programs on organic farming practices.
Installation
Clone the repository: git clone https://github.com/your-username/organic-first.git
Navigate to the project directory: cd organic-first
Open the index.html file in a web browser.
Technologies Used
HTML
CSS
JavaScript
Azure Technologies Used
Static Web Apps
Azure Bot
Usage
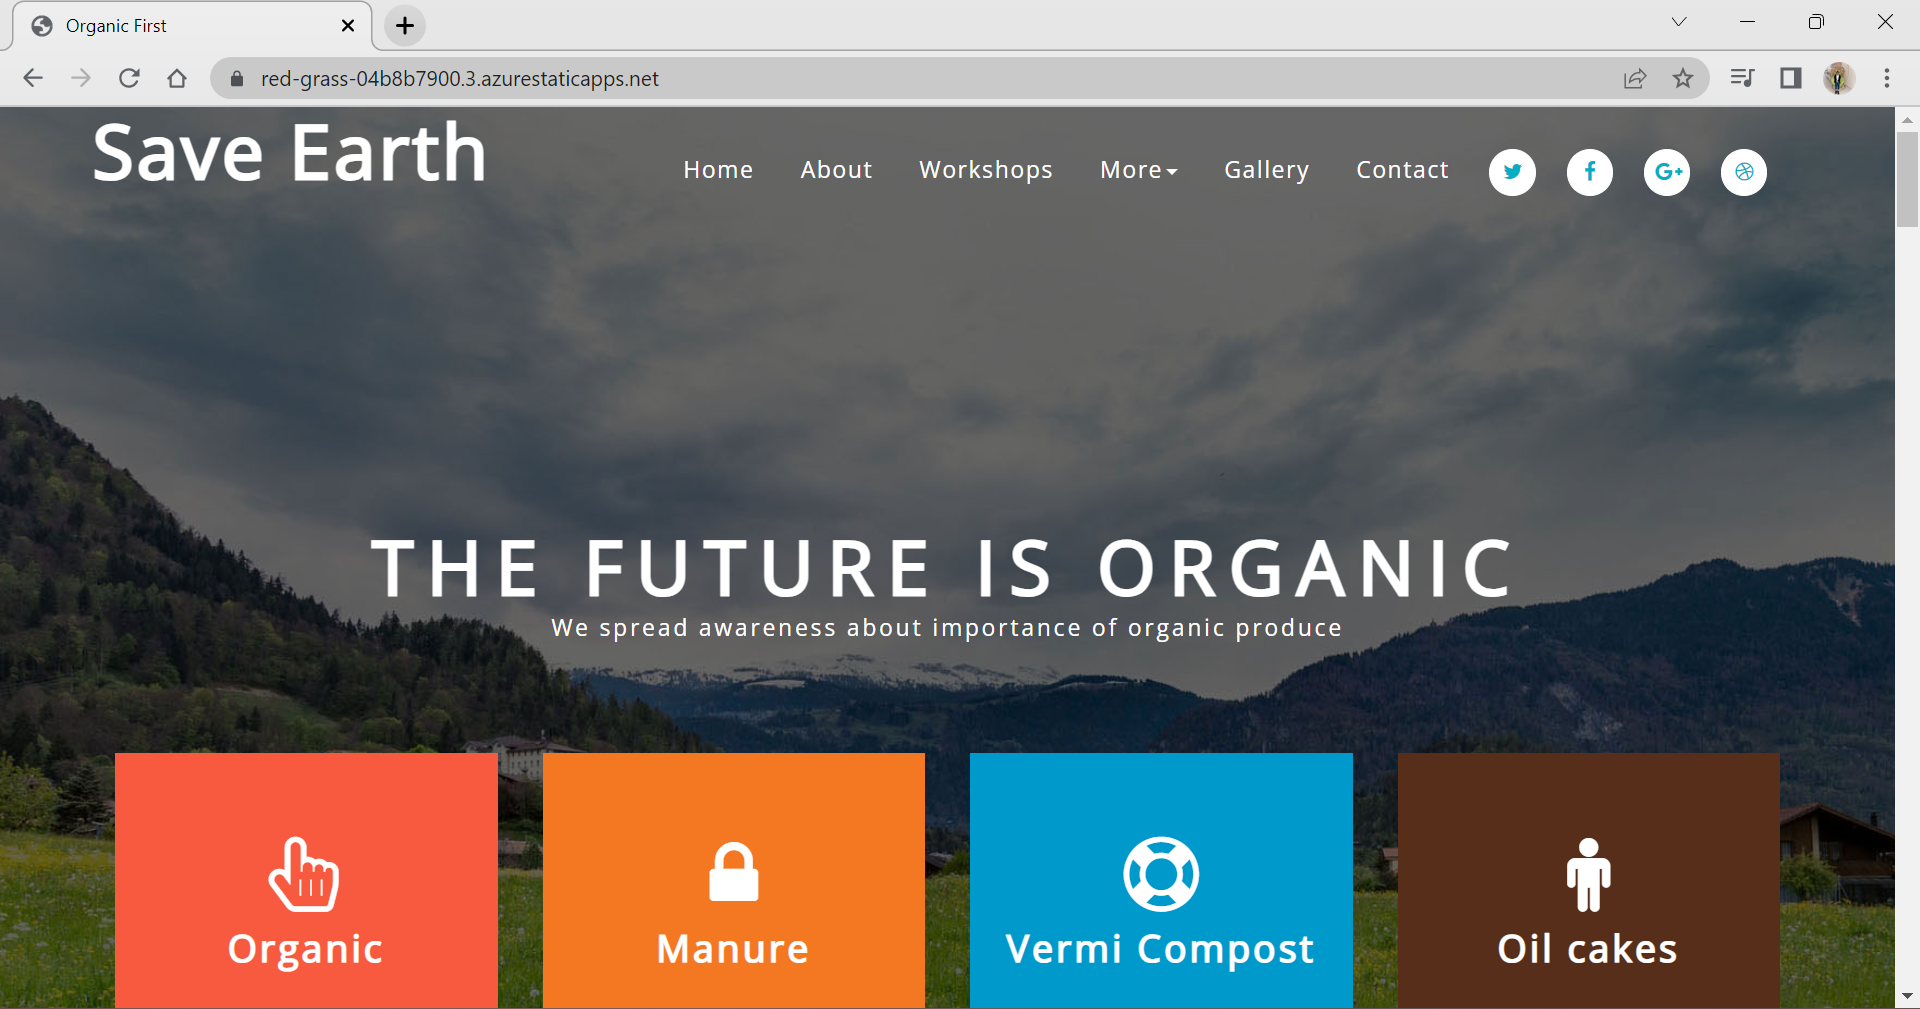
Upon opening the website, you will be presented with the homepage showcasing various sections related to organic farming.
Explore the educational resources section to learn more about organic farming techniques and sustainable practices.
Gain awareness about the importance of organic farming and its benefits in promoting environmental sustainability and health.
Institutions interested in collaborating can contact us through the provided contact details on the website.
Example Screenshots
Home Page
About Page
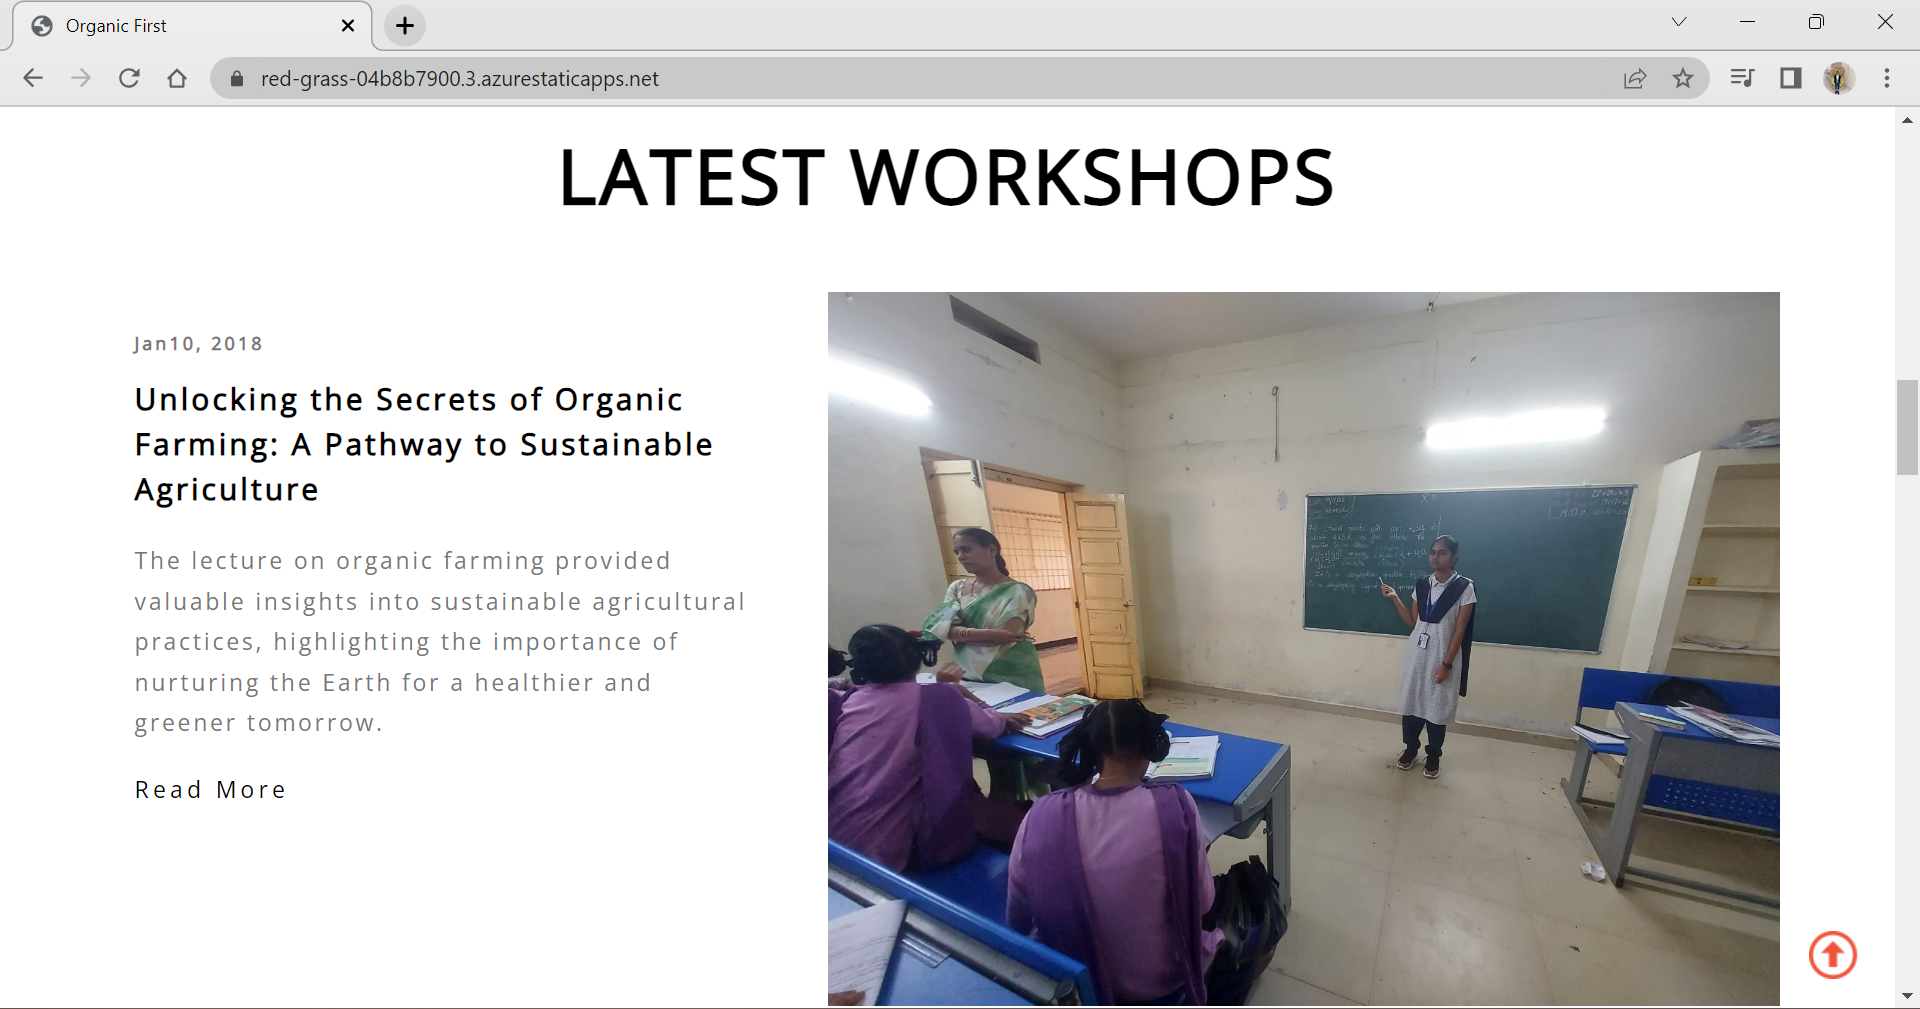
Workshops Page
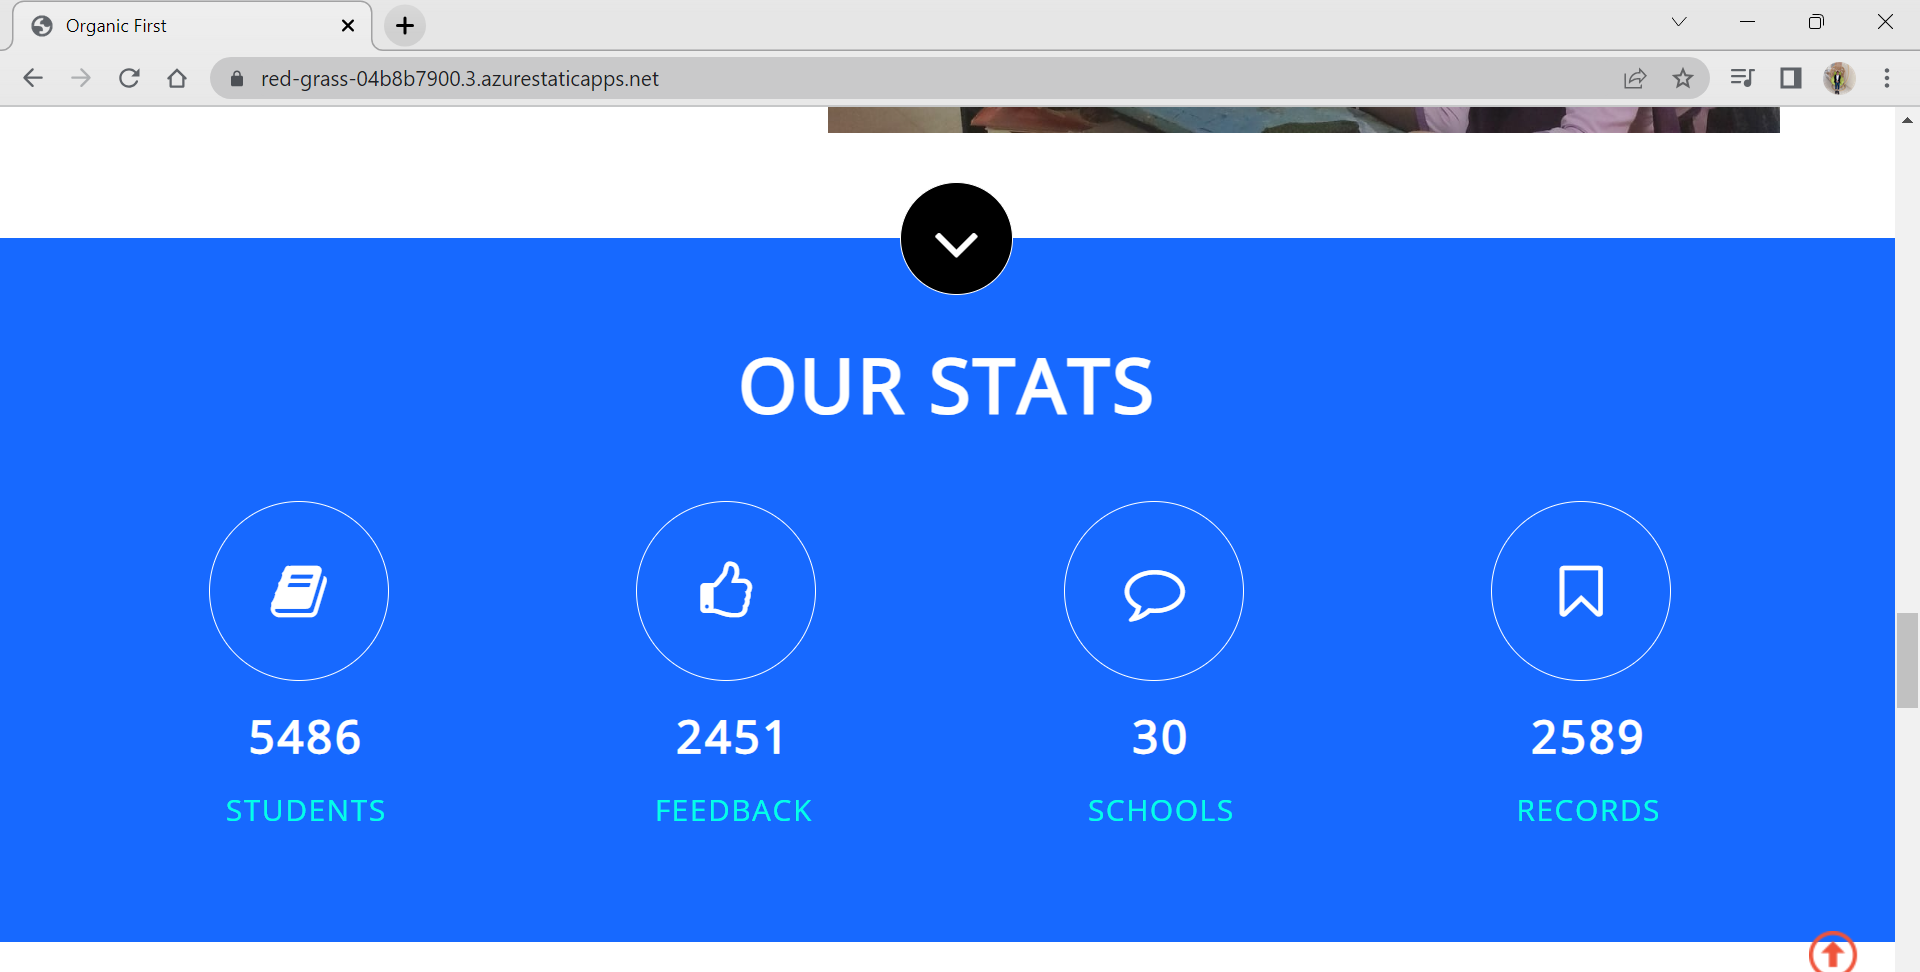
Stats Page
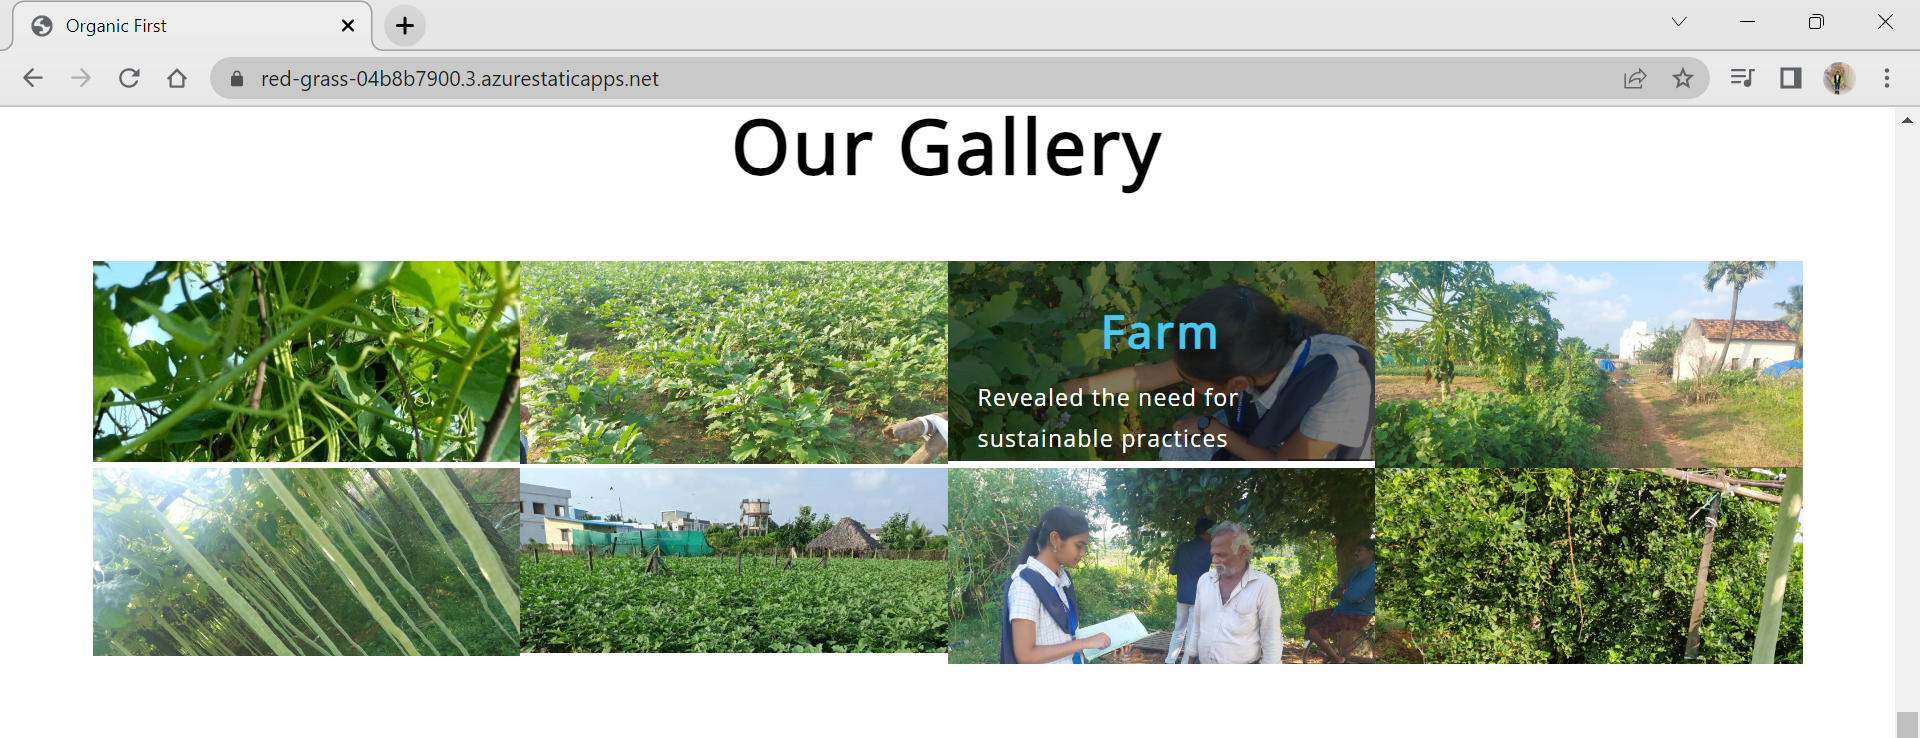
Gallery Page
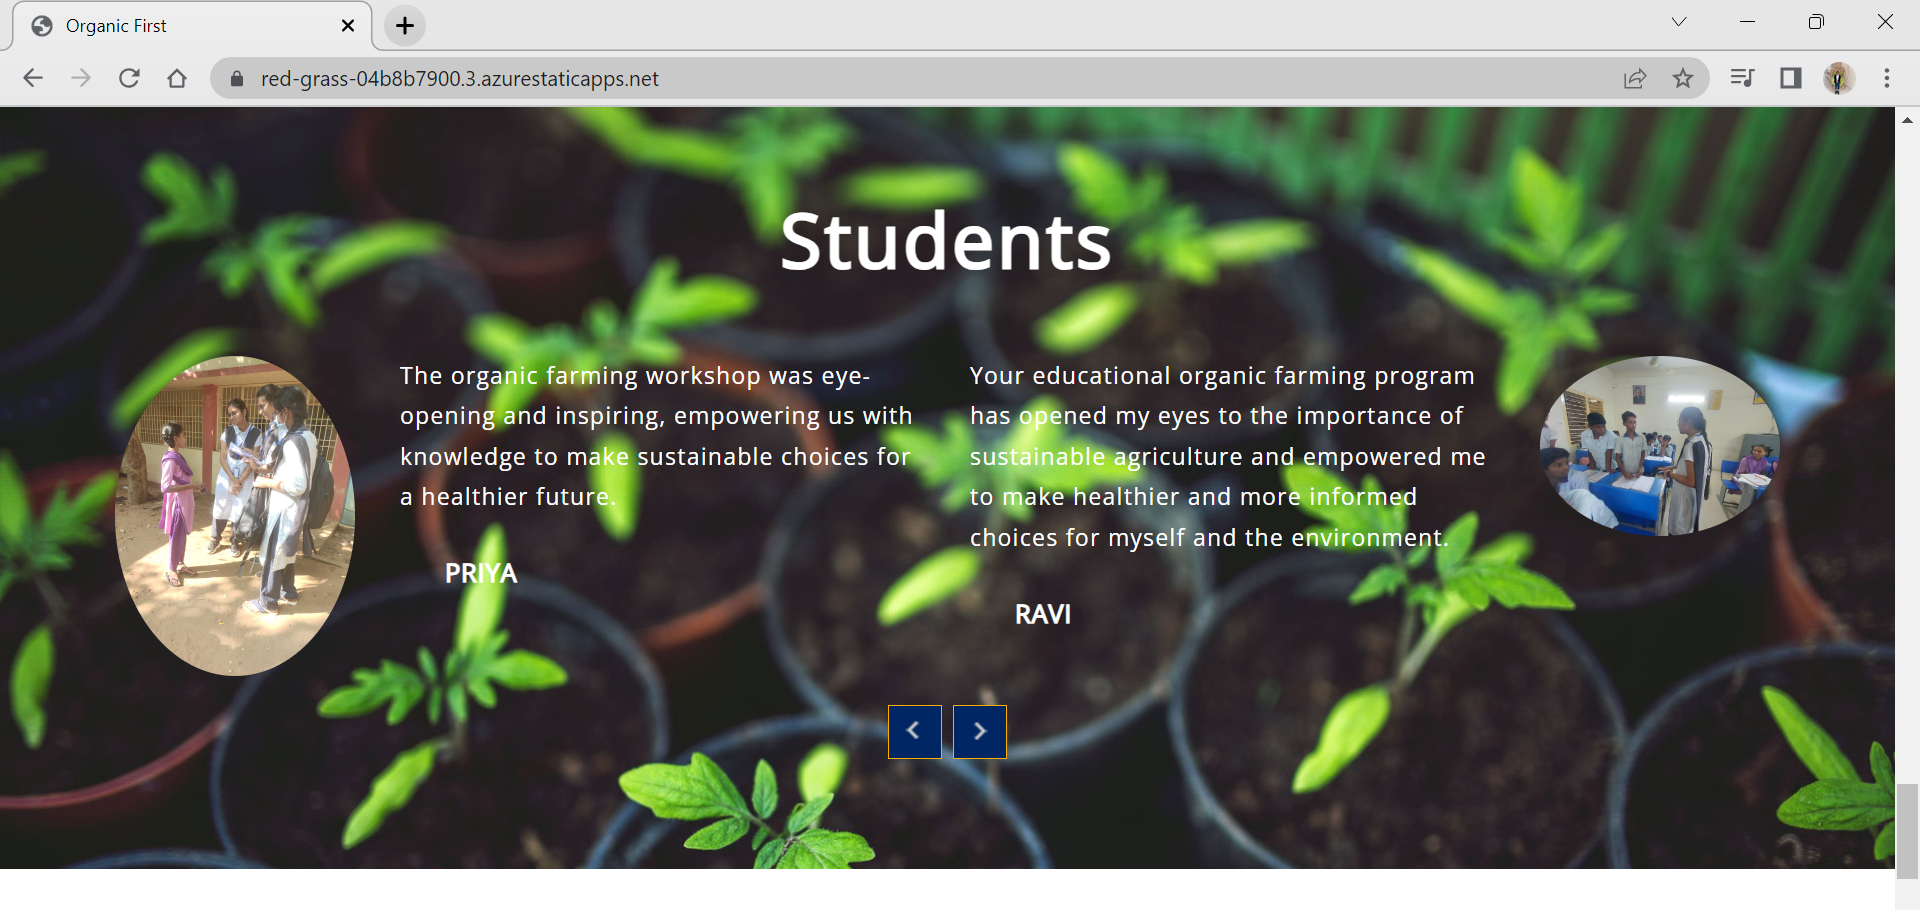
Feedback Page
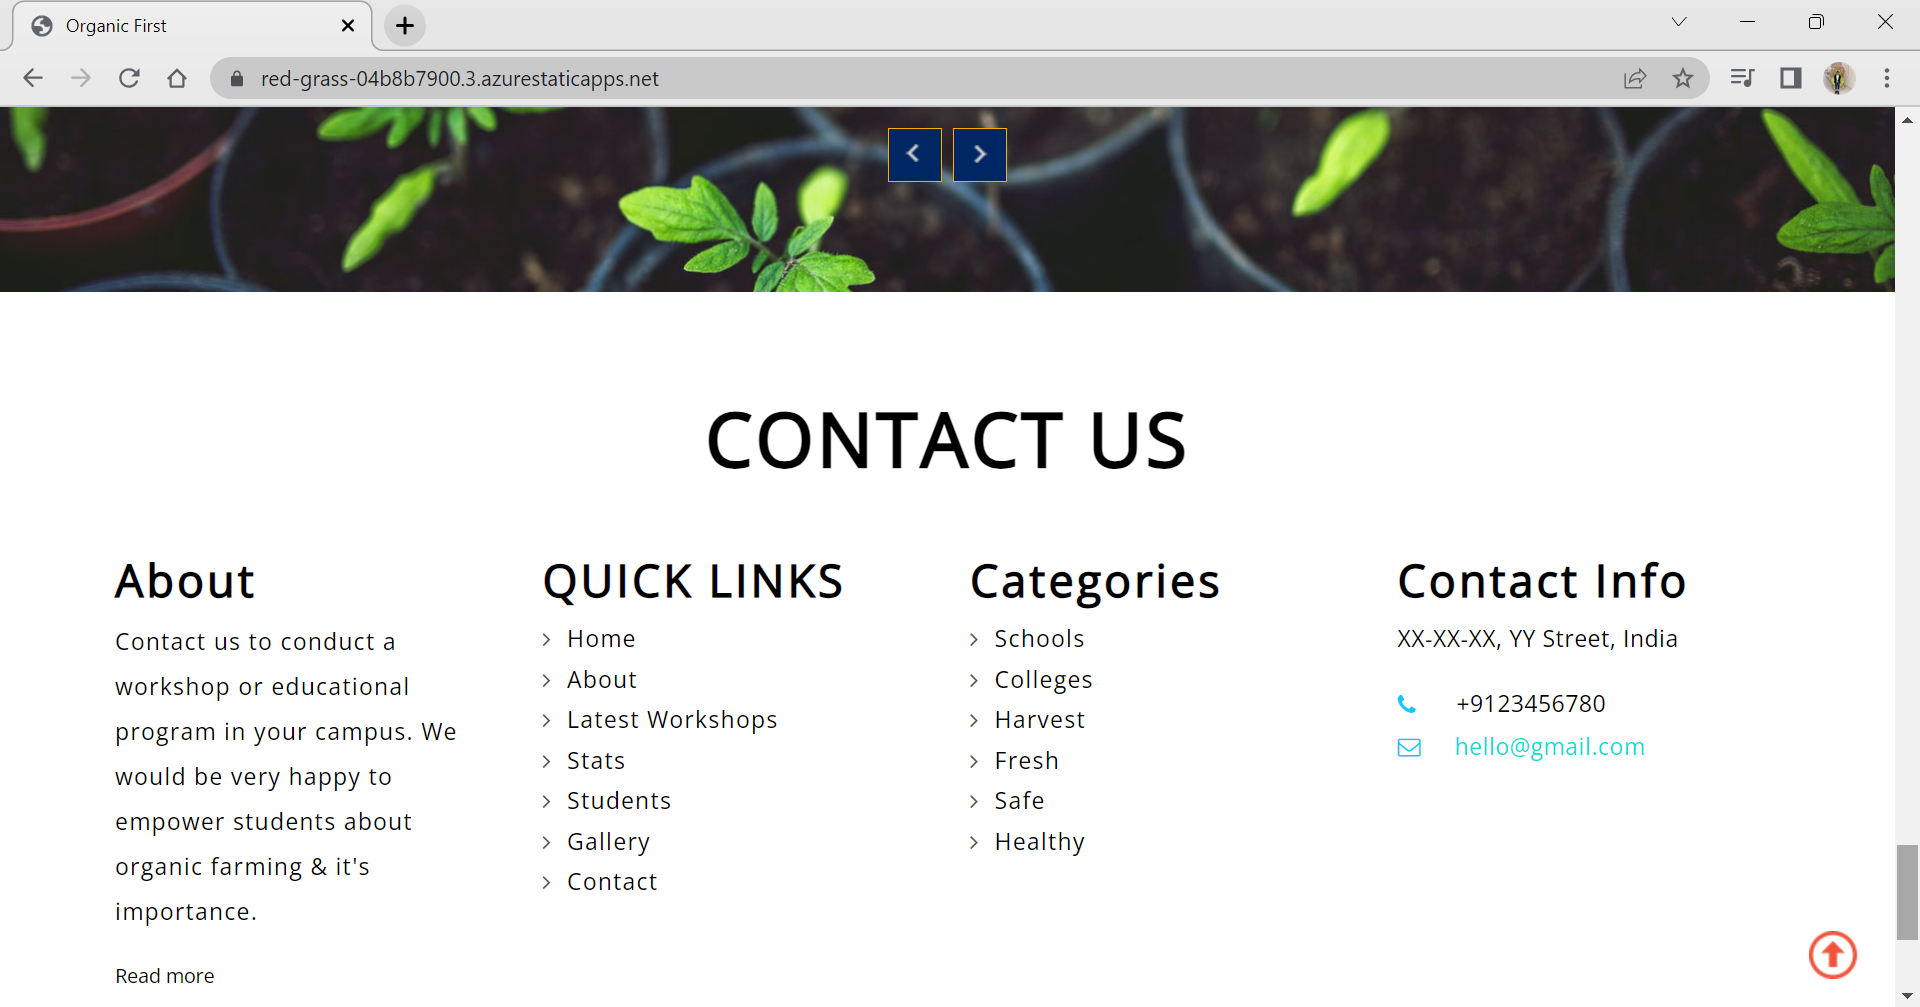
Contact Page
Awareness Bot Page
Acknowledgements
I would like to thank the Future Ready Talent, GitHub and Microsoft Azure for providing the opportunity to work on this project and contribute to the promotion of organic farming.
Thank you for your interest in Organic First. Together, let’s promote organic farming and contribute to a sustainable and healthier future!
Bare Metal Hello World Operating System for Raspberry Pi 4/4b.
Boots and prints Hello World via TTL.
Build Dependencies
Compiling the kernel required the ARM 64 GNU C Cross Compiler.
On Arch / Arch based distros it can be installed by running :
sudo pacman -S aarch64-linux-gnu-gcc
GNU Make is used to handle the kernel compilation. It is normally present on major distributions but can be easily installed by referring to the distribution specific install instructions.
On Arch / Arch based distros it can be installed individually by running :
The Makefile contains 2 targets.
A standard all target which compiles the kernel image.
A clean target which cleans the build directory and any present images.
In order to compile the kernel image just cd to the source folder (rpi4-hello-world if you executed the above git command) and execute :
make
This should generate an img file called kernel8.img . This is our compiled kernel image.
Testing the Kernel Image
The custom kernel image can be tested by following two different methods.
[Lite variant is recommended since our kernel is super bare bones and
is not going to do much apart from just printing Hello World]’
Mount the boot partition
a. Find out the device and partition name by running
sudo fdisk -l
In my case the following was the output for the SD Card.
 Disk /dev/sda: 29.72 GiB, 31914983424 bytes, 62333952 sectors
 Disk model: SD/MMC/MS PRO
 Units: sectors of 1 * 512 = 512 bytes
 Sector size (logical/physical): 512 bytes / 512 bytes
 I/O size (minimum/optimal): 512 bytes / 512 bytes
 Disklabel type: dos
 Disk identifier: 0x9730496b

 Device     Boot  Start     End Sectors  Size Id Type
 /dev/sda1         8192  532479  524288  256M  c W95 FAT32 (LBA)
 /dev/sda2       532480 3661823 3129344  1.5G 83 Linux
b. Once you have found the device partition name, mount it by running
sudo mount <device> root-mount
Here <device> is the device partition name (/dev/sda1 according to the above sample) and root-mount is the folder where we will mount the partition.
Copy over the config and kernel image
Copy the config.txt and kernel8.img over to root-mount folder. If you have compiled the kernel image without making any modifications to this Github repos source or config then you will need to rename the kernel8.img to kernel8-rpi4.img as mentioned in the config.
kernel=kernel8-rpi4.img
The above line in config.txt is used to reflect this change.
Note: You’ll need to execute the cp/mv command as root, ie by using sudo
Unmount the partition
Unmount the partition by running
sudo umount root-mount
Where as mentioned, root-mount is the mount directory of the boot partition.
With this your SD Card is ready to be tested on the Raspberry Pi.
2. Generating a custom flashable image
In this process we extract the required basic firmware files from the Raspbian OS images and use those to generate a barebones flashable image for our tiny kernel image.
[Lite variant is recommended since our kernel is super bare bones and
is not going to do much apart from just printing Hello World]
Mount the boot partition of Raspberry Pi OS Image
a. Find the start offset of boot partition by running fdisk on the downloaded image.
example :
fdisk -l 2021-05-07-raspios-buster-armhf-lite.img
This should print the partition table for the img
Sample output :
 Disk 2021-05-07-raspios-buster-armhf-lite.img: 1.75 GiB, 1874853888 bytes, 3661824 sectors
 Units: sectors of 1 * 512 = 512 bytes
 Sector size (logical/physical): 512 bytes / 512 bytes
 I/O size (minimum/optimal): 512 bytes / 512 bytes
 Disklabel type: dos
 Disk identifier: 0x9730496b

 Device                                    Boot  Start     End Sectors  Size Id Type
 2021-05-07-raspios-buster-armhf-lite.img1        8192  532479  524288  256M  c W95 FAT32 (LBA)
 2021-05-07-raspios-buster-armhf-lite.img2      532480 3661823 3129344  1.5G 83 Linux
Here our start offset for the boot partition is 8192
b. To mount the partition, we find the byte offset by multiplying the start offset value with sector size. In this case it is going to be 8192 * 512 = 4194304
After that you can mount the partition from the img by running the following command
sudo mount -v -o offset=4194304 -t vfat 2021-05-07-raspios-buster-armhf-lite.img root-mount
Substitute 2021-05-07-raspios-buster-armhf-lite.img with the name of your Raspbian OS image and root-mount with the path / folder name of your mount point.
Extract the required files
The following output of tree command depicts the files which needs to be extracted from the mounted boot partition
Copy the above mentioned files / folder and place them in another directory with the same file structure as displayed. For the forthcoming steps I will refer to that safe keeping folder as boot-bkp
Unmount the boot partition of Raspberry Pi OS Image
Once your files are ready, you can safely unmount the folder by running :
sudo umount root-mount
Where as previously mentioned, root-mount is the path of your mount point.
Add your config and kernel image
Copy the config.txt and kernel8.img over to boot-bkp folder. If you have compiled the kernel image without making any modifications to this Github repos source or config then you will need to rename the kernel8.img to kernel8-rpi4.img as mentioned in the config.
kernel=kernel8-rpi4.img
The above line in config.txt is used to reflect this change.
Once done, your file and directory structure inside boot-bkp should look something like this :
The generated image file can be flashed using the official Raspberry Pi Imager software or via dd using the following command :
sudo dd if=generated.img of=<device path> bs=4M
where <device path> is the path of your SD card interface (Example: /dev/sdb)
3. Testing the SD Card
For this you will be requiring a USB to TTL Cable. I bought mine from Robu.in in India. Same thing is listed on Amazon.com aswell.
Note: Make sure the TTL cable you are purchasing has PL2303 mentioned in the details. This is the chipset which I’ve been working with and can confirm about it’s functioning. Other chipsets might work but YMMV.
a. Setting up the TTL connection.
Adafruit has a great article for this. You can read that here.
In short you will need to wire up the GPIO RX TX pins and open the serial window on your machine.
b. Booting the Raspberry Pi
Insert your SD Card into the Pi and boot.
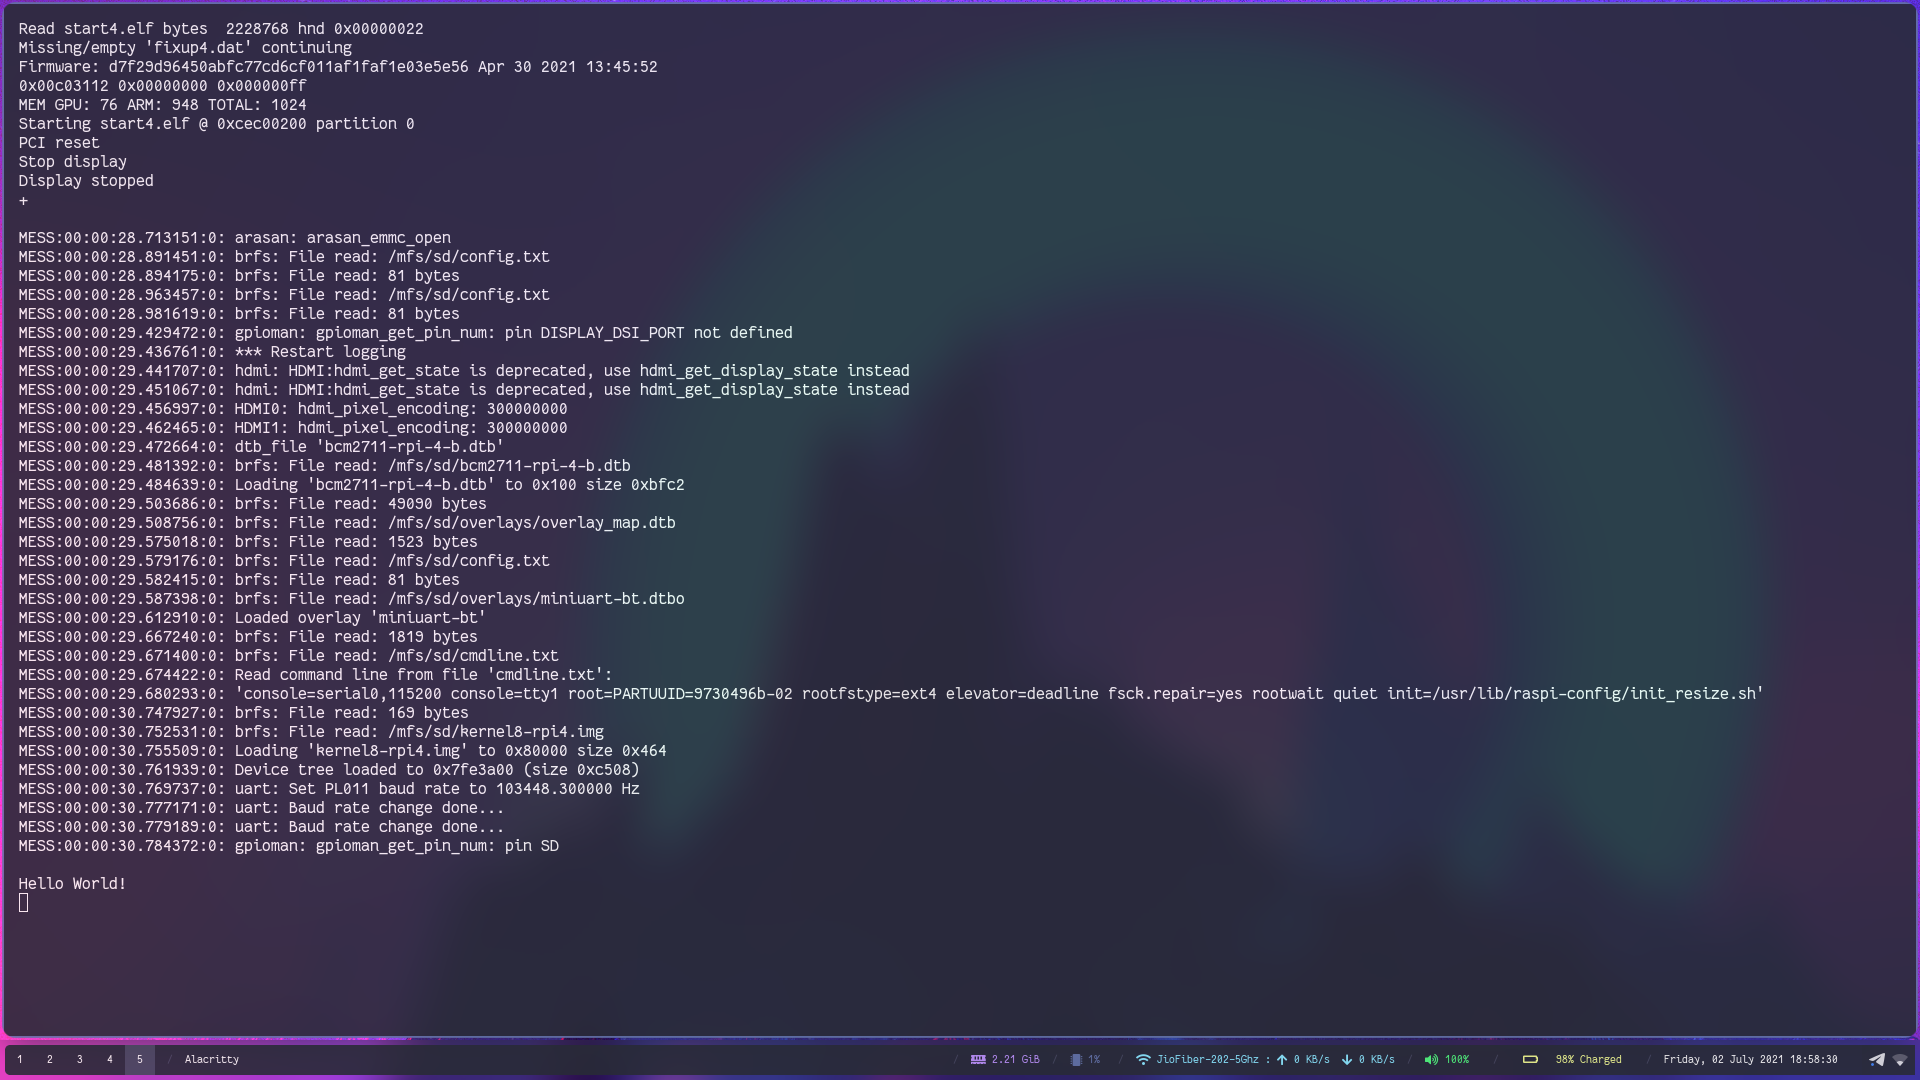
If the image is fine and everything else is OK, the serial window should start printing debug information at first and then
Hello World!
must be there at the bottom of your screen.
Here’s a sample screenshot of the Pi booting:
Debugging
Serial Window prints garbled output
This happens when the baud rate gets messed up via the initial serial communication. An easy way to fix this is to turn off the Pi, remove the TTL adapter from your machine, and re connect it to the machine.
Check pin connections
Make sure to check if the cables are attached properly.
Check if SD Card is flashed properly
Often times the process can lead to an incorrectly formatted card. Reformat it and test again.
Check if Raspberry Pi is loading your OS
On the Pi, there is a red and green light present. If everything including your SD Card and kernel are fine, then the Green LED should blink repeatedly which indicates that the OS is being loaded by the Pi. If this happens and nothing is printed, check the Kernel code for mini_uart. If this however does not happen then check the SD Card again.
from requests.exceptions import ConnectionError
import json
import echovr_api

try:
    game_state = echovr_api.fetch_state()

    print(f"Game status: {game_state.game_status}")
    print(f"Seconds on clock: {game_state.game_clock}")

    if (game_state.blue_team.score > game_state.orange_team.score):
        print("Blue team is winning!")
    elif (game_state.orange_team.score > game_state.blue_team.score):
        print("Orange team is winning!")
    else:
        print("It's tied!")

    print(f"Score: {game_state.blue_team.score} - {game_state.orange_team.score}")

except ConnectionError as e:
    print("Connection refused. Make sure you're running Echo VR with the -http option and that you're in a match.")
except json.decoder.JSONDecodeError as e:
    print("Could not decode response. (Not valid JSON.)")
The problems are taken from the Assignments given by Professor Piotr Gmytrasiewicz while teaching Artificial Intelligence at University of Illinois at Chicago and uploaded after taking his consent.
The book which I used to study for this course is Artificial Intelligence: A Modern Approach, 4th US edition. The slides for the course can be accessed by clicking here
The code for every program is written in C++. And can be run by using any online compiler and just typing in the input in the standard text input.
Sample Input for BFS, IDDFS, A-Star, IDA-Star: 1 0 2 4 5 7 3 8 9 6 11 12 13 10 14 15
where 0 represents the blank tile.
Search Algorithms:
The 15 puzzle is represented as a 2D matrix using vector of vectors. In this problem the cost for each move is 1.
And the four directions are traversed using dir_row[] and dir_col[] array.
A set is used to keep track of the visited states. isVisited() is used to check if the current state of the puzzle is visited and if it is not visited then mark the state as visited using the setVisited() function.
print_state() function is NOT used. It can be used to check the board configuration for debugging purpose.
expand() function is used to expand the next reachable states(board configurations) from the current state.
Breadth First Search:
In this uninformed search, nodes which are expanded are pushed to the end of queue.
This gives optimal solution for 15 puzzle as the cost is 1 per step.
Space is a problem for this algorithm a lot of nodes are generated and stored in the queue.
Iterative Deepening Depth First Search:
This takes less memory than an Breadth First Search and a Depth First Search.
In this algorithm we keep increasing the depth limit by 1 after each Depth First Search.
depth_limited_search() is function to search for a solution node till the depth limit l.
iterative_deepening_search() is a function where we increase the depth limit each time we are not able to find the goal state.
A-Star:
This is an informed search where we have used 2 heuristics(Manhattan Distance and Number of Misplaced Tiles) as a heuristic.
The values of f(n) is stored in the struct node each time we expand the node.
This algorithms gives an optimal solution by expanding all nodes with f(n) < C* and some nodes with f(n) = C*
I have used a priority queue for the fringe.
manhattan_distance() and heuristic() is used to calculate the heuristic.
Iterative Deepening A-Star: Here is the wikipedia article that I used for this problem. Read the wiki page for explanation.
The memory usage is lower than the A-star algorithm.
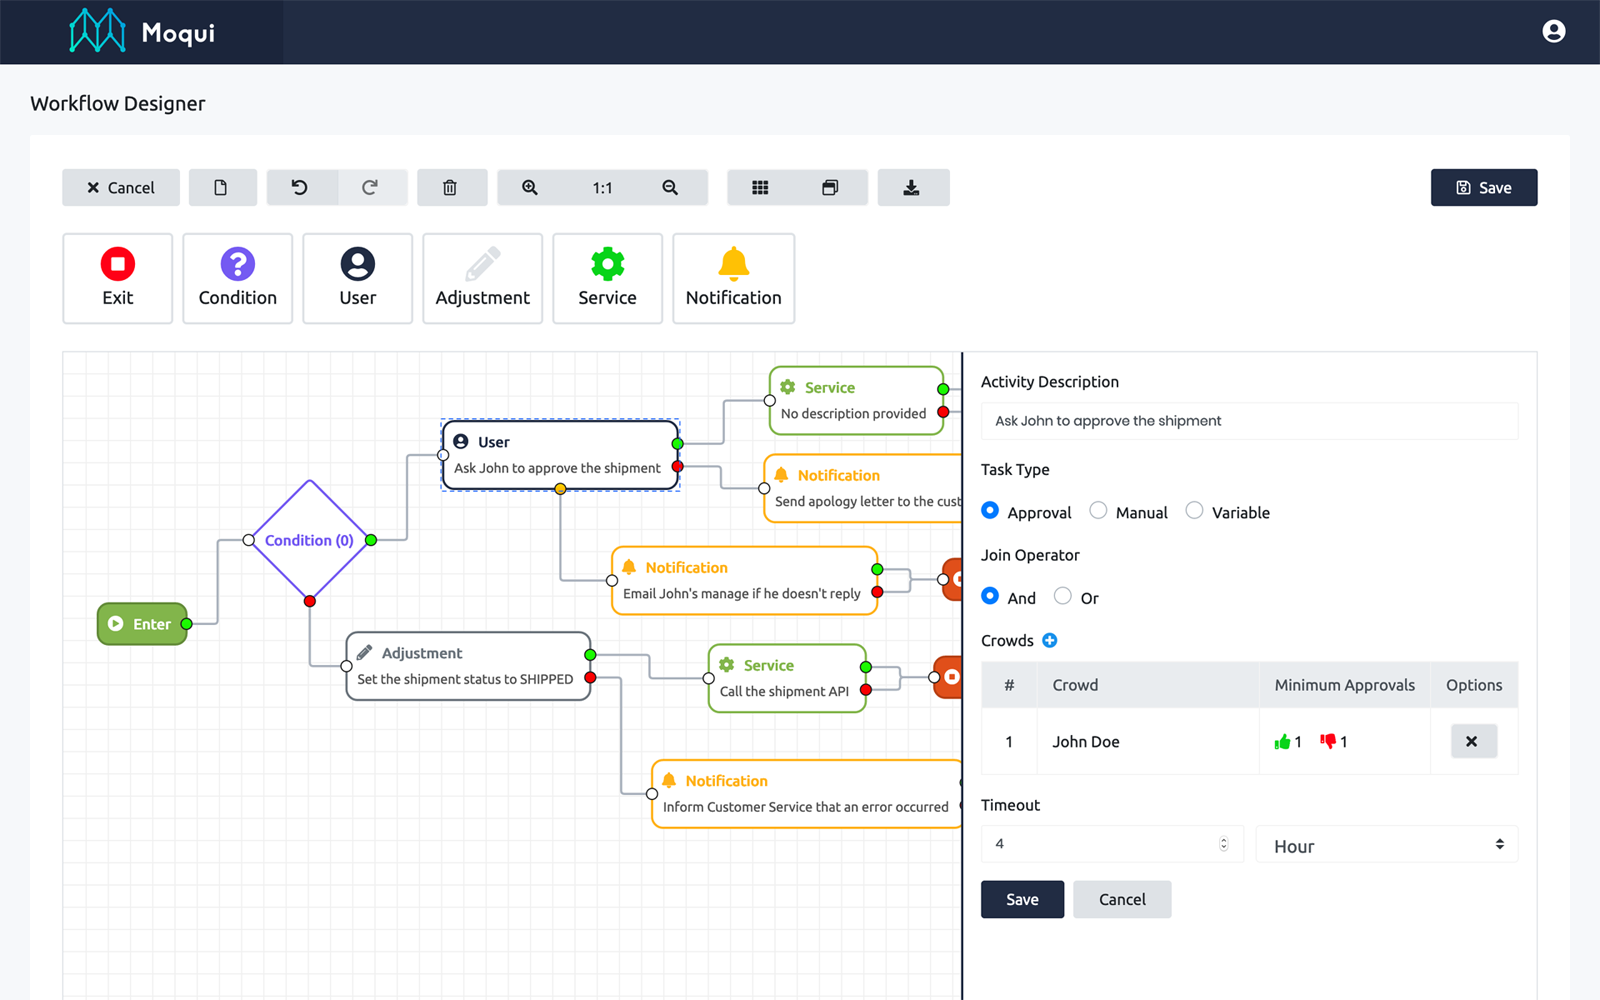
The workflow designer uses NPM for dependency management. Install dependencies and run the workflow designer using these commands:
$ npm install
$ npm run serve
You can also build the project for production use using this command:
$ npm run build
Remember, the user account you use to login must be a member of a group that has access to the Moqui Workflow REST API artifact group.
Configuration
The workflow designer communicates with your Moqui instance using REST APIs.
The base API URL path is configured in the .env file.
All API requests are pass though a proxy to reach the Moqui instance, this is configured in the vue.config.js file.
module.exports={// ...proxy: {// proxy all requests starting with /rest/s1 to localhost:8080'/rest/s1': {target: 'http://localhost:8080',ws: true,changeOrigin: true}}// ...}
See the Configuration Reference for a detailed description of all available configuration options.
Authors
This project was build with ❤️ by the good fellas at Netvariant.
License
This project is licensed under the CC0 License, see the LICENSE.md file for details.
A simple heap and running median (min/max heaps) implementation that can be used on small development boards like Arduino UNO.
Getting Started
These instructions will get you a copy of the project up and running on your local machine for development and testing purposes. See deployment for notes on how to deploy the project on a live system.
Prerequisites
If you want to test the library and the main program locally on your desktion machine, you will need the a C++17 development environment like IntelliJ CLion.
More info on C++17 ia available on isocpp.org website
Installing
Compile, build, and run the main program (test)
Use the zip file for the Arduino and check out the examples.
=== Nostr Verify ===
Contributors: jeherve
Tags: nostr, discovery, well-known, jrd
Requires at least: 6.2
Requires PHP: 7.2
Tested up to: 6.2
Stable tag: 1.2.0
License: GPLv2 or later
License URI: https://www.gnu.org/licenses/gpl-2.0.html

Verify yourself with Nostr, using NIP-05

== Description ==

Nostr Verify is a WordPress plugin that allows you to verify yourself with Nostr, using NIP-05, just like described in [this documentation](https://github.com/nostr-protocol/nips/blob/master/05.md).

== Installation ==

- Go to Plugins > Add New.
- Search for "Nostr Verify".
- Install and activate the plugin.
- You can then find a "Nostr" section in your user profile, where you can enter your Nostr name and public key.

Once you've saved your changes, you should be verified with your Nostr client of choice.

== Changelog ==

### Next

#### Changed

- Various code standardization improvements.

### 1.2.0 - 2023-05-31

#### Changed

- Expand the settings description to explain how to use the plugin to create a Nostr identifier without a username if preferred.
- Better handle situations when no user has entered their Nostr details yet.

### 1.1.0 - 2023-05-01

#### Added

- Initial release.


 https://github.com/featuredotapp/cli